Using hale»connect resources in QGIS
Both open source and proprietary geographic information systems currently offer limited out-of-the-box support for complex GML. Simple viewing of vector geometry and associated attribute data is supported by some GISs, such as QGIS, however standard geoprocessing operations and spatial analyses are not supported for complex GML. For a more in depth discussion of GML support in GIS software, visit the CanIUse INSPIRE github repository. Harmonized INSPIRE data is complex GML and this tutorial aims to demonstrate how hale»connect view and download services can be loaded in QGIS.
This tutorial uses:
- the current version of QGIS 3.6.1 'Noosa' which was released on 22.03.2019
- the current version of the QGIS GML Application Schema Toolbox plugin 1.2.0
Viewing a WMS
In order to view your hale»connect WMS in QGIS, you will need a URL link to the capabilities document of your service. You can directly access the capabilities documents for WMS 1.1.1 and 1.3.0 from the View Services section of your dataset. To copy any URL to the clipboard, click the icon to the right of the URL.
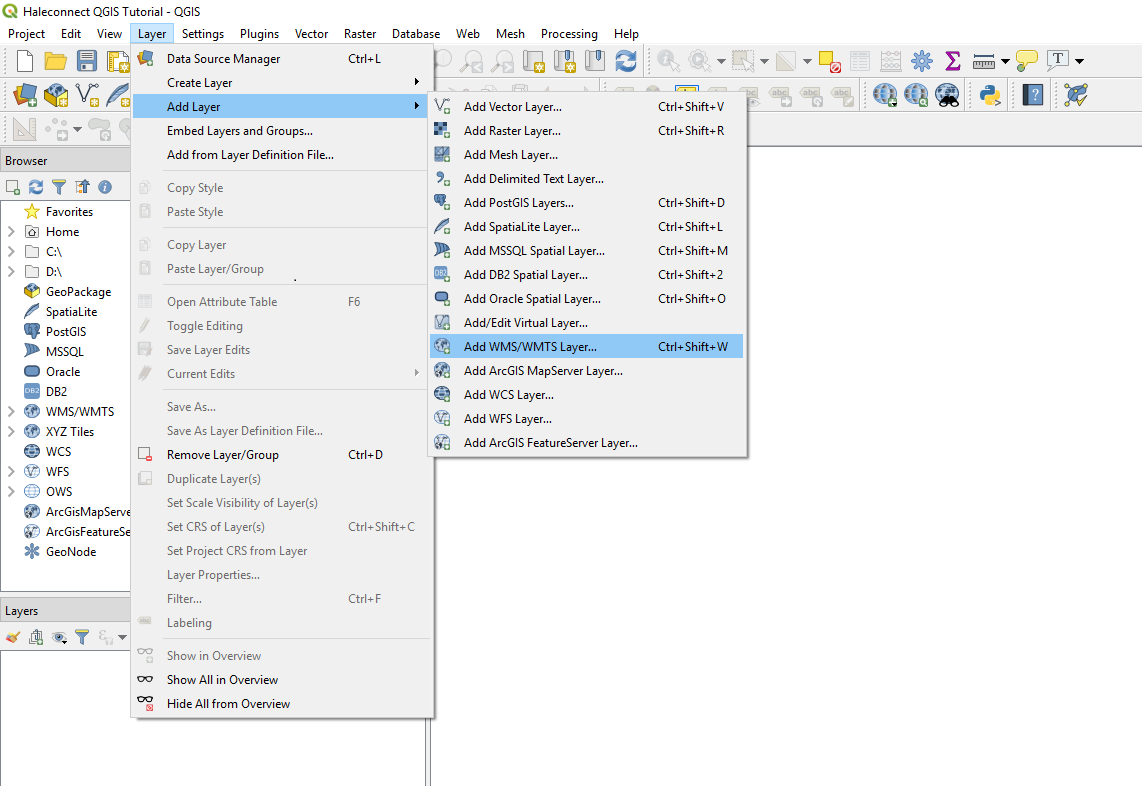
Open QGIS and click on the Layer menu. From the Layer menu, select Add Layer and then select Add WMS/WMTS Layer.
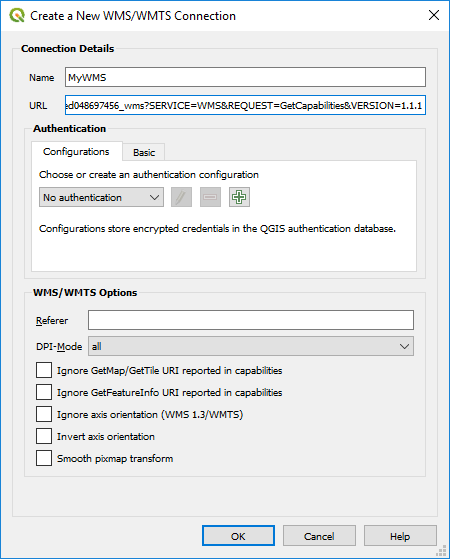
In the Data Source Manager dialog, click the New button. This opens a dialog which allows you to define a new WMS connection. Give your new connection a name, and enter the URL to your hale»connect service in the URL field. Click OK.
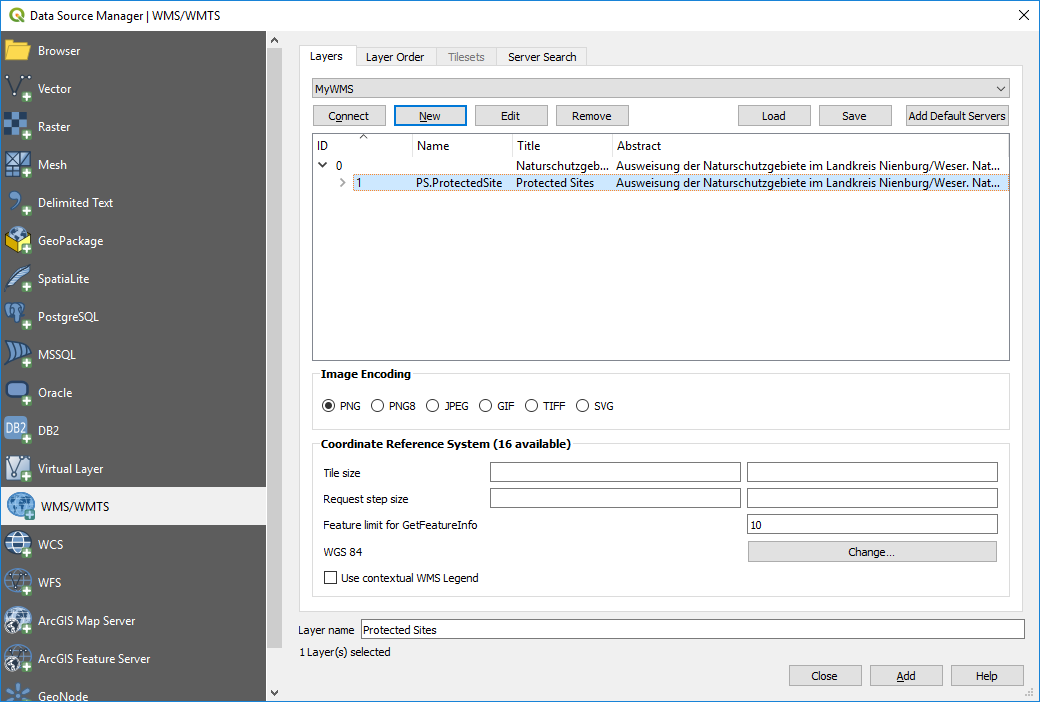
Your new layer should appear at the top of the Data Source Manager. Click the Connect button to access the service. You can select one or more layers to add to your map. Click on the Layer Order tab in the Data Source Manager dialog to control the drawing order of your layers. When you are finished, click the Add button in the bottom right corner of the Data Source Manager dialog to add the data to your map.
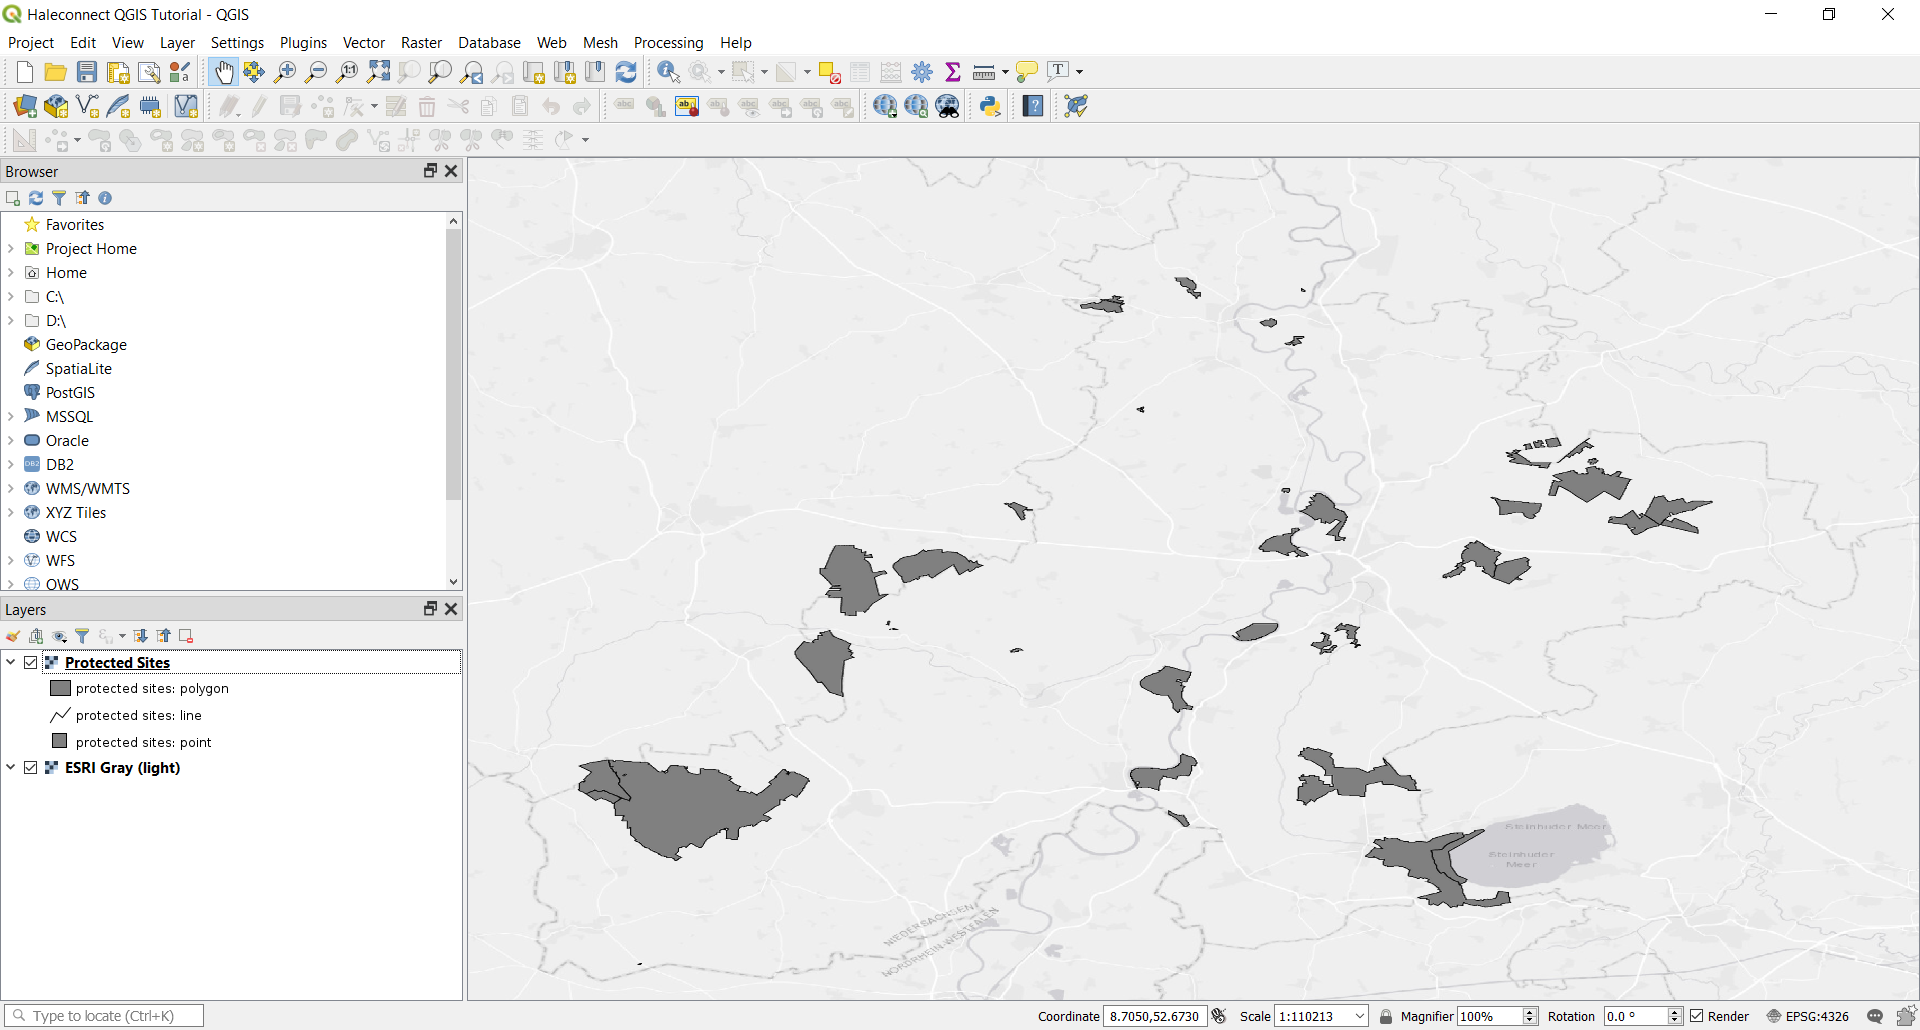
The layers you select should appear in the layers panel on the left. QGIS displays the legend received from the GetLegendGraphic request made to the WMS. Right click on a layer and select Properties to view more information about the service.
Identifying features in a WMS
Once you have added your view service layers to the map, you can explore them using the Identify button.
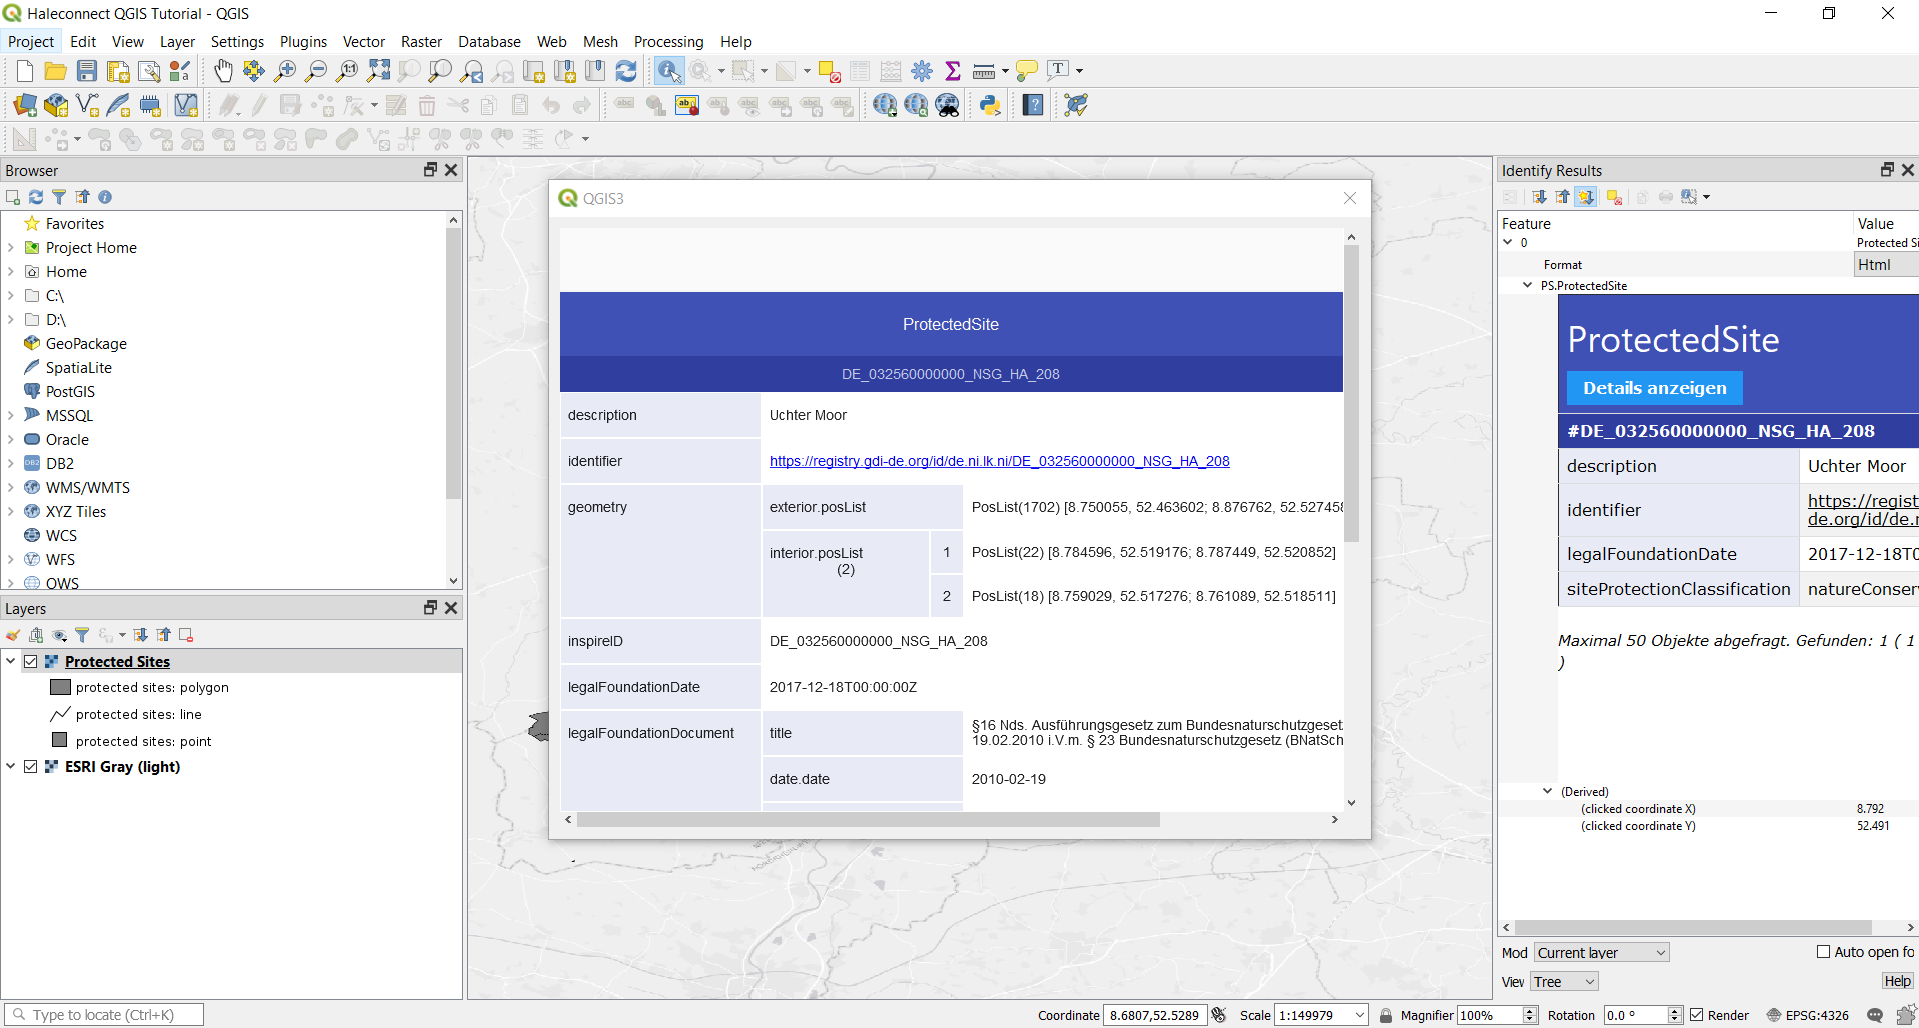
Click on the Identify button. In a standard QGIS installation, the button is found in the top row of toolbars. It is marked with an info symbol and white arrow. First, click on the Identify icon. Next, click on the layer you want to explore in the Layer panel on the left. Next, click on a feature in the map. The Identify Results panel containing the GetFeatureInfo response will appear to the right. If you click on an area with overlapping features, results for each feature will be listed. hale»connect services provide the unique ability to explore complex GML through the hale»connect FeatureExplorer. In the Identify Results panel in QGIS, click on the Details anzeigen button for the feature you are interested in. The hale»connect FeatureExplorer will open in a new dialog in QGIS. The FeatureExplorer enables you to navigate through any level of nested, complex GML to further investigate the linked resources, linked features, codelists or attributes that you are interested in.
Viewing a WFS
In order to view a WFS based on complex GML in QGIS, you need to first install the QGIS GML Application Schema Toolbox plugin.
Installing the GML Application Schema Toolbox plugin
Open QGIS and click on the Plugins menu. From the Plugins menu, select Manage and Install Plugins. The Plugins dialog opens.
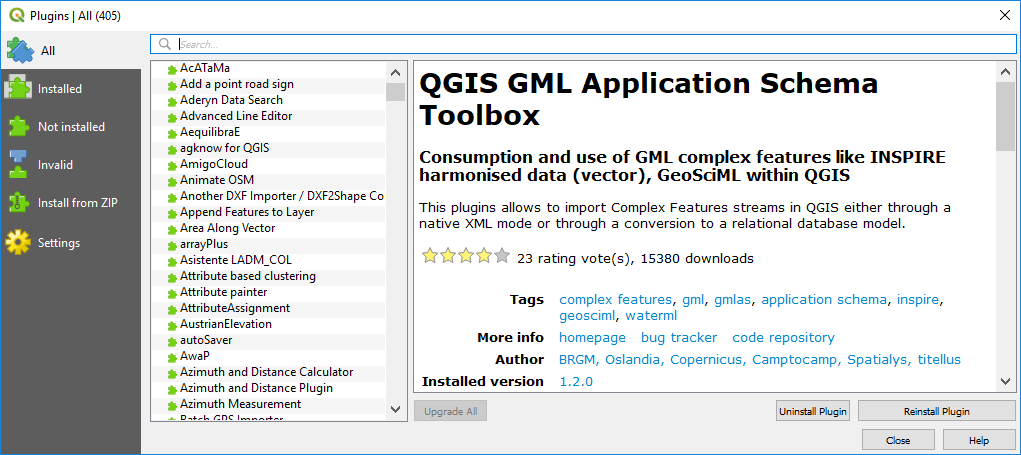
Enter GML Application Schema in the search bar. Select the plugin and click on Install Plugin in the bottom right corner. The QGIS GML Application Schema Toolbox plugin will install.
To access the plugin, click on the Plugins menu in QGIS. A QGIS GML Application Schema Toolbox plugin menu option is added to the Plugins menu dropdown.
Using the GML Application Schema Toolbox plugin
In order to view your hale»connect WFS in QGIS, you will need a URL link to your download service. You can directly access the URL from the Download Services section of your dataset. To copy the URL to the clipboard, click the icon to the right of the URL.
Open QGIS and click on the Plugins menu. From the Plugins menu, select QGIS GML Application Schema Toolbox. Next, select Load (wizard).
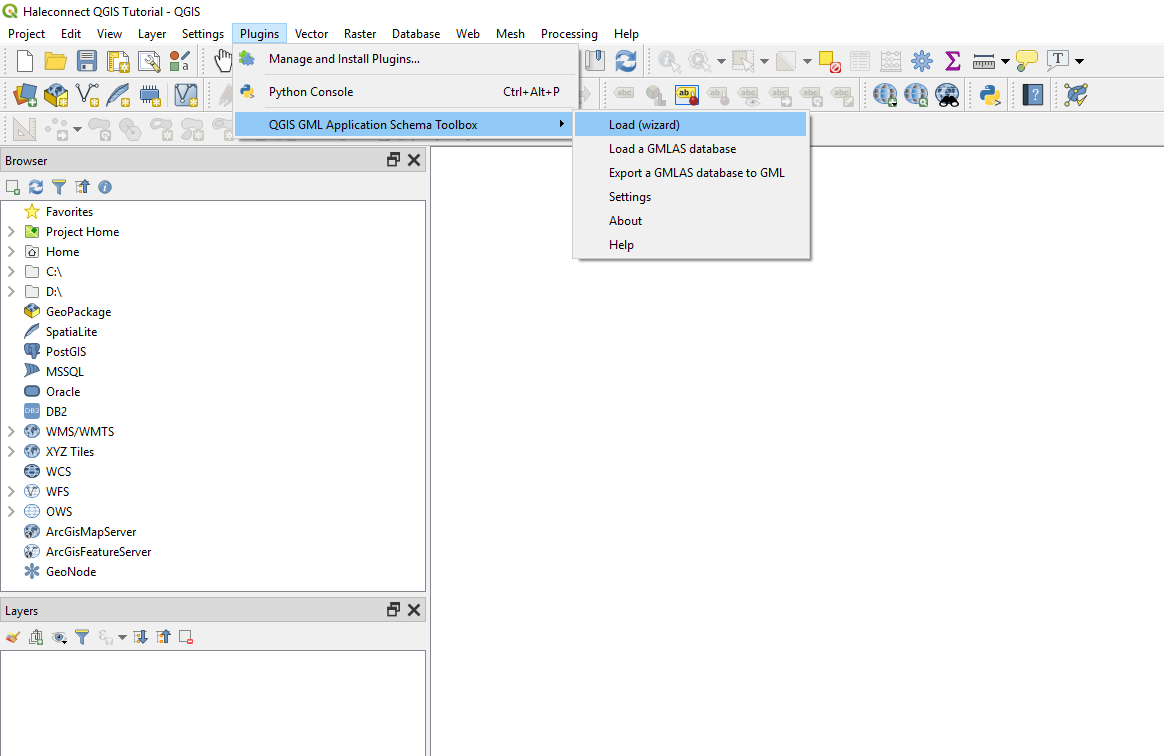
In the Load wizard, select WFS and click Next.
In the WFS Options menu of the Load wizard, click the New button. This opens a dialog which allows you to define a new WFS connection. Give your new connection a name, and enter the URL to your hale»connect service in the URL field. Click OK.
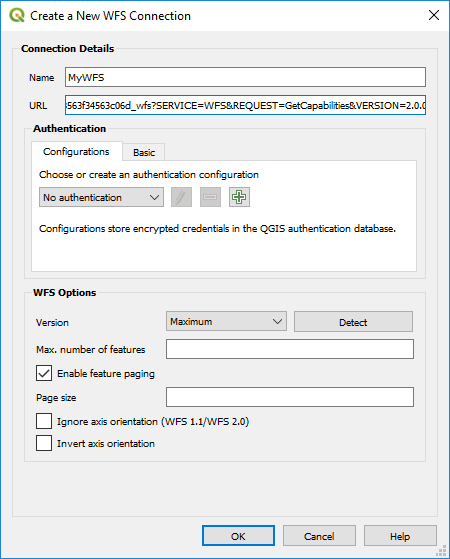
Your new layer should appear at the top of the WFS Options menu. Click the Connect button to access the service. You can select one or more feature types to add to your map. You can limit the number of features requested by checking the Limit to parameter. When you are finished, click the Next button. Select Load in XML mode and click the Next button.
In the XML options menu, click Swap X/Y axis. The default coordinate reference system of hale»connect services is EPSG:4326. hale»connect uses the EPSG database definition of EPSG code 4326 (WGS 84) and QGIS uses the Proj4 definition of EPSG code 4326 (WGS 84) and this causes the axis to be flipped. You can change the applied CRS in the Source section of the layer properties after you load the WFS. Click the Finish button in the bottom right corner of the Load wizard dialog to add the data to your map.
The layers you select should appear in the layers panel on the left. Right click on a layer and select Properties to view more information about the service.
Identifying features in a WFS
Once you have added your download service layers to the map, you can explore them using the Identify button.
Click on the Identify button. In a standard QGIS installation, the button is found in the top row of toolbars. It is marked with an info symbol and white arrow. First, click on the Identify icon. Next, click on the layer you want to explore in the Layer panel on the left. Next, click on a feature in the map. The Identify Results panel will appear to the right, click on the View feature form icon to view the attributes of the feature you are interested in.
A new dialog opens in QGIS which enables you to navigate through any level of nested, complex GML to further investigate the linked resources, linked features, codelists or attributes that you are interested in.
Learn more
QGIS maintains its own documentation. For more information about using OGC services in QGIS, visit the following link: Working with OGC Data