Configuring an online transformation on hale»connect
The hale»connect platform can be configured to enable users to publish, transform and validate datasets, metadata and services within minutes. Automated workflows only need to be configured once by a Theme manager or Superuser, and can be re-used multiple times by any user in an organisation. For users with data that is frequently updated, automated transformation workflows make updating and republishing view and download services easy. hale»connect can quickly and automatically rerun transformations and republish services and metadata to reflect changes in source data.
This tutorial reviews the steps required to configure the automation of an online transformation workflow. Publishing an online transformation requires the configuration of multiple resources and it must be performed by a user with Theme manager or Superuser permissions. Before we begin, let's review a list of the resources we need:
- a hale»studio transformation project
- a schema(s) for your source data
- a schema(s) for your target data
- a source theme
- a target theme
- a source dataset
IMPORTANT: The target dataset is automatically generated by the online transformation workflow. The target dataset is typically transformed, INSPIRE GML.
Tutorial data
The installation of hale»studio and the creation of alignments are beyond the scope of this tutorial. For more information, visit hale»studio.
For this tutorial, we will use:
- An existing hale»studio transformation project. You can download the transformation project here.
- Two shapefiles Contains OS data © Crown copyright and database right 2018. You can download the shapefiles here.
The transformation project maps UK Ordnance Survey Open Rivers data to the INSPIRE feature types WatercourseLink and HydroNode, which are found in the INSPIRE Hydro Network 4.0 schema. The source data are UK Ordnance Survey shapefiles which contain river data.
Publishing an Online Transformation Project
Step 1: Create a transformation project
The easiest way to create a transformation project on hale»connect is to export it directly from hale»studio. hale»studio offers users the option to export a transformation as a hale»connect project using an export wizard. The wizard requires users to provide hale»connect log-in information, which it uses to upload the transformation project to the logged in user's online account.
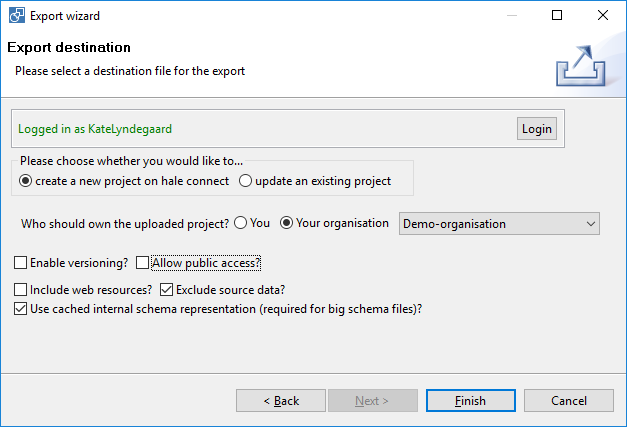
If you have hale»studio installed on your computer, you can load the transformation project named "OpenRivers.halex" which is included in the tutorial data. You can export the OpenRivers transformation project directly to your hale»connect account. If you need help, visit the hale»studio User Guide help topic Share and update a transformation project on hale»connect for further instructions.
You can also upload a transformation project manually.
A transformation project is a hale»studio project using the formats *.halex or *.halez that has been uploaded to hale»connect. The project contains references to source and target schemas, an alignment that defines the transformation by mapping elements from the source schema to elements in the target schema, additional configuration for the loaded schemas and configuration options for the desired output.
To create a new transformation project directly on hale»connect without uploading it from hale»studio, follow this workflow logged in as a Theme Manager or Superuser:
-
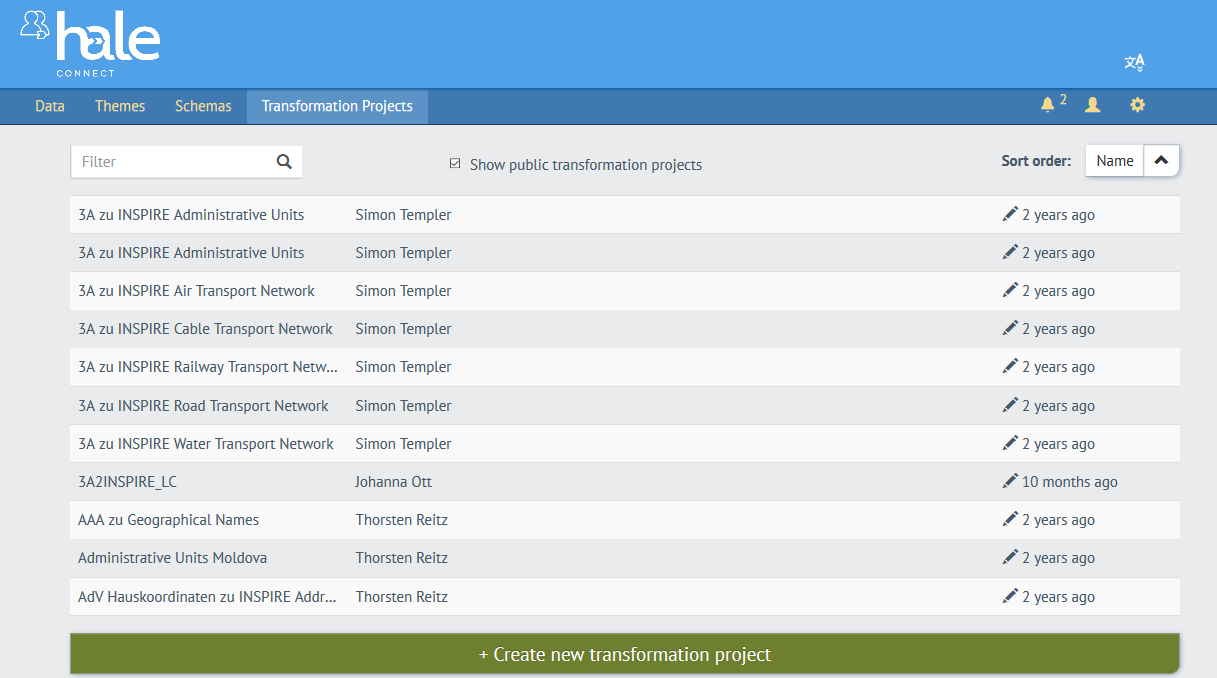
Go to “Transformation Projects” on the main toolbar
-
Go to “Create new transformation project” at the bottom of the transformation project list
-
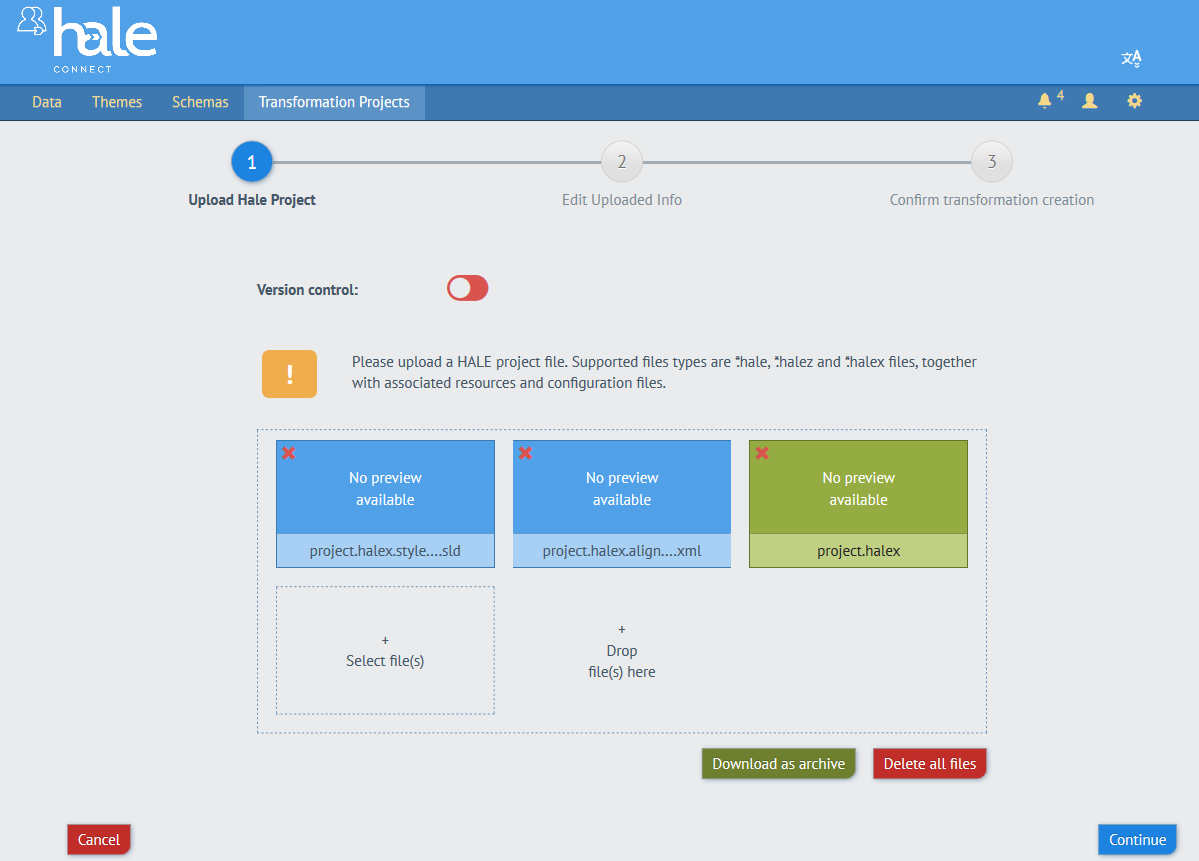
Upload the OpenRivers.halez file located in the tutorial data folder. Once it is uploaded you will see a .halex.styles.sld file, a .halex.alignment.xml file and a .halex file. These files store the transformation project.
-
Click the «Select file(s)» button and navigate to the project file(s).
Version control is turned off by default. Enable the version control toggle switch to maintain a record of incremental changes to your transformation project. You can view the history of transformation project changes in the History section of your transformation project. When you are finished, click «Continue»
-
The name, author and description of your transformation project is automatically populated after upload. You can edit the extracted information if desired. When you are finished, click «Continue»
-
In the final step, review your transformation project and click «Create» to save your project
Step 2: Create a source schema
The next step in the online transformation project workflow is to create a source schema, or schemas, for your source data. Your source data is the data that you want to transform to another format, such as INSPIRE GML. hale»connect provides several options for creating a schema. You can visit the following documentation pages to learn more about schema creation:
- Create a schema based on a schema preset
- Create a schema by uploading a schema file
- Create a schema using a web address
- Create a new schema based on an existing schema
In this tutorial, we will work with the option to create a schema by uploading a schema file. Your source data is in shapefile format, and the option to create a schema by uploading a schema file enables us to simply upload a shapefile. hale»connect automatically reads the shapefile and generates a schema for you.
To create a new schema based on a shapefile, follow this workflow logged in as a Theme Manager or Superuser:
-
Go to “Schemas” on the main toolbar
-
Go to “Create new schema” at the bottom of the schema list
-
Select creation method. In the first step, select «Upload schema file». Click «Continue»
-
Next, define the schema you want to use. The schema definition is determined by the creation method you selected in the previous step.
-
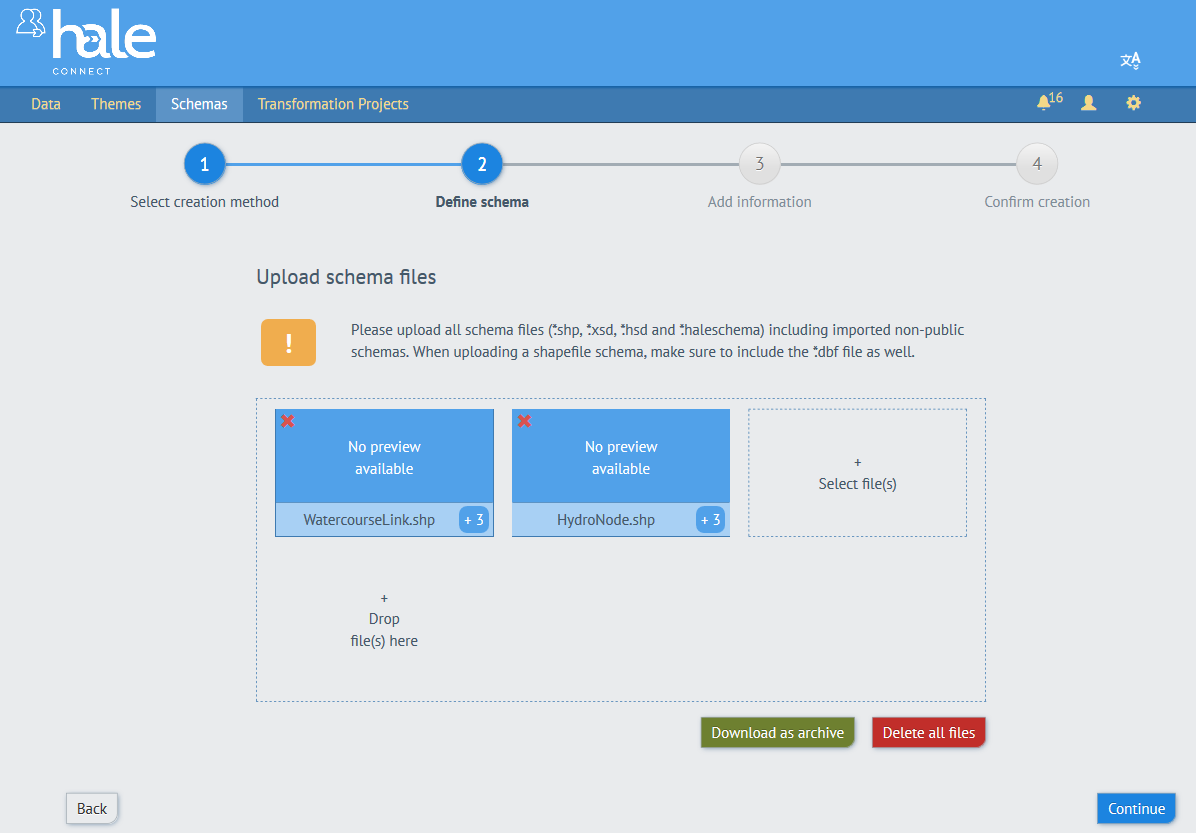
Click the «Select file(s)» button and navigate to the shapefiles located in the tutorial data folder. Add the shapefiles named HydroNode and WatercourseLink. You can also upload the zipped folder which contains the shapefiles. When you are finished, click «Continue»
-
Add information. Provide the name, author, type and version of your schema. When you are finished, click «Continue»
-
Confirm creation. In the final step, review your schema. You have the option to add or create a theme for your schema. Toggle the switch to enable the creation of a theme. When you are finished, click «Create» to save the schema and create an associated theme.
-
Step 3: Create a target schema
The next step is to create a schema for the target data. The purpose of the workflow is to create INSPIRE compliant GML, so you have to create the schema that will be used by the target dataset generated by the online transformation. The transformation project you are working with transforms UK OpenRivers data to INSPIRE HydroNode and WatercouseLink features. These INSPIRE feature types are found in the INSPIRE Hydro Network 4.0 schema, so you will create this schema on hale»connect. hale»connect contains a large number of schema presets, including all of the INSPIRE schemas.
To create a new schema using a schema preset, follow this workflow logged in as a Theme Manager or Superuser:
-
Go to “Schemas” on the main toolbar
-
Go to “Create new schema” at the bottom of the schema list
-
Select creation method. In the first step, select «Select preset». Click «Continue»
-
Define schema. Next, define the schema you want to use. The schema definition is determined by the creation method.
-
Select the INSPIRE Hydro Network 4.0 schema preset from the dropdown list of available presets.
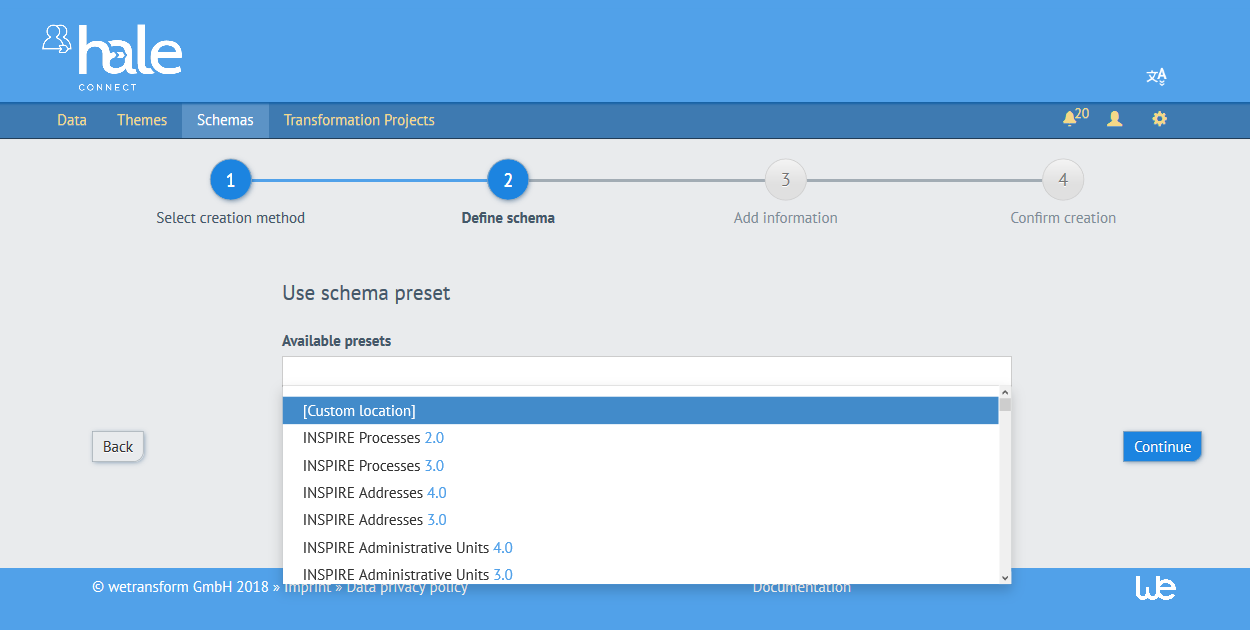
-
Add information. Provide the name, author, type and version of your schema. Ensure that you select INSPIRE as type from the dropdown menu. When you are finished, click «Continue»
-
Confirm creation. In the final step, review your schema. You have the option to add or create a theme for your schema. Toggle the switch to enable the creation of a theme. When you are finished, click «Create» to save the schema and create an associated theme.
-
Step 4: Configure a source theme
A theme is a re-usable configuration object used to define common settings for dataset metadata, service publishing and transformation. A theme has several elements:
- A schema, defined through association with a number of feature types
- Display properties for the fields and types of that schema, such as aliases and styling
- A metadata configuration which defines the metadata fields that need to be provided, as well as default values and autofill rules for a high degree of automation
- An association with a transformation project that enables format conversion and schema transformation
- A configuration for an automated workflow that can be set to execute service publishing and data transformation on certain events such as an update to a dataset
IMPORTANT: You must have Theme Manager or Superuser permissions to create and configure a theme.
In this step we will configure the source theme to perform an online transformation and update the published webservices when the source data experiences a change.
First, navigate to the theme you created during schema creation in Step 2.
- Go to “Themes” on the main toolbar
- Enter the name of your source theme in the search bar. When you create a theme during schema creation, your theme is automatically given the same name as your schema. You can also use the dropdown menu next to “Sort order”. Select “Last modified” to view your most recent themes.
- Select your theme from the list of resources
The first section we will look at, is the Feature types section.
- Click the section named Feature types
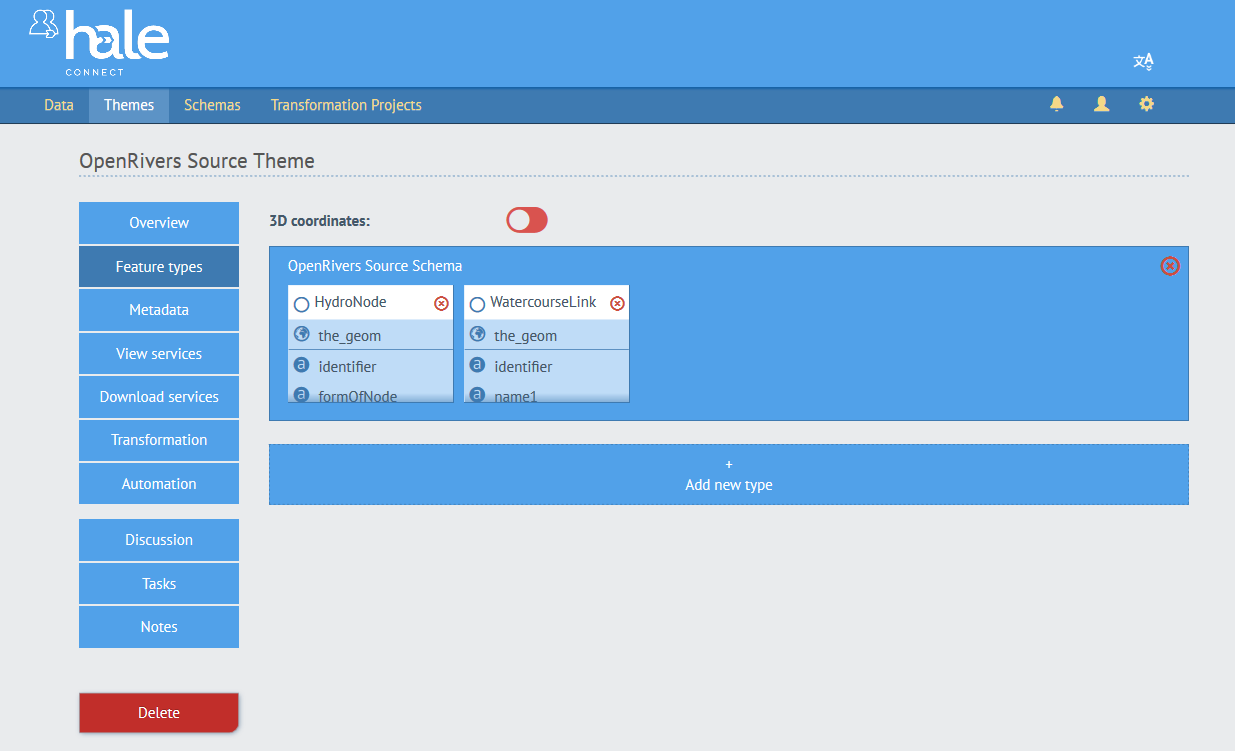
The Feature types section displays all of the feature types in the theme's associated schema. Verify that you can see both the WatercouseLink and HydroNode feature types. You can click on the feature type to add aliases for fieldnames.
Next, we will add a transformation configuration to the source theme in the Transformation section.
A transformation configuration associates a transformation project and target theme to your source data. The configuration tells hale»connect what to do when you upload new, or updated data. In this tutorial, we want hale»connect to run an online transformation and publish the transformed, INSPIRE compliant GML data every time the source data is updated. Let's do that now.
- Click the section named Transformation
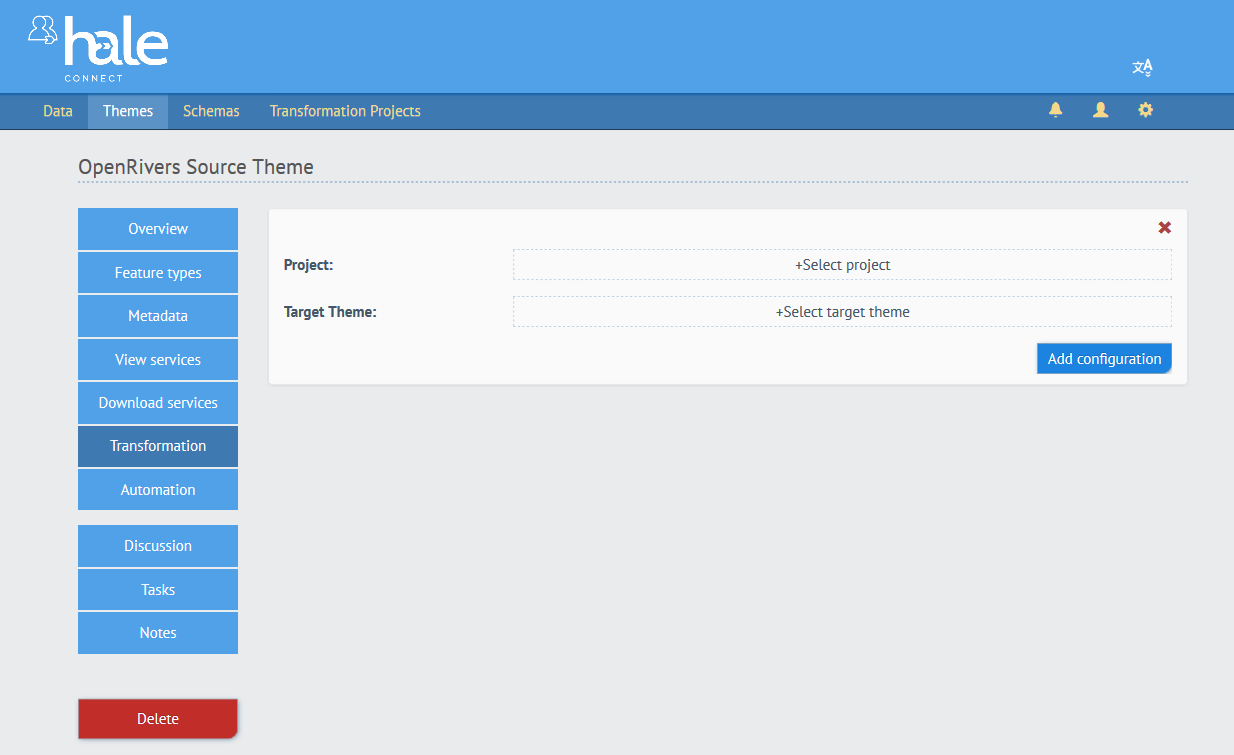
- Click the “Add new transformation configuration” button
- Click the “+ Select project” button and navigate to the transformation project you uploaded to hale»connect. If you did not edit the name, enter OpenRivers in the search bar. Click the » button to add the transformation project.
- Click the “+ Select target theme” button and navigate to the target theme you created during schema creation in Step 3. The target theme provides hale»connect the information it needs to publish the transformed data.
- Click “Add configuration”
We have now added a transformation configuration to the source theme, and we can also set automation rules which determine when hale»connect will run the online transformation we have just added. An automated workflow performs service publishing and data transformation as a background process that does not require any user interaction. The automated workflow responds to events including data and configuration updates and transformations. When events occur, external data or metadata is retrieved, services are created and published, and transformation projects are executed. We can add automation rules in the Automation section of the source theme.
- Click the section named Automation
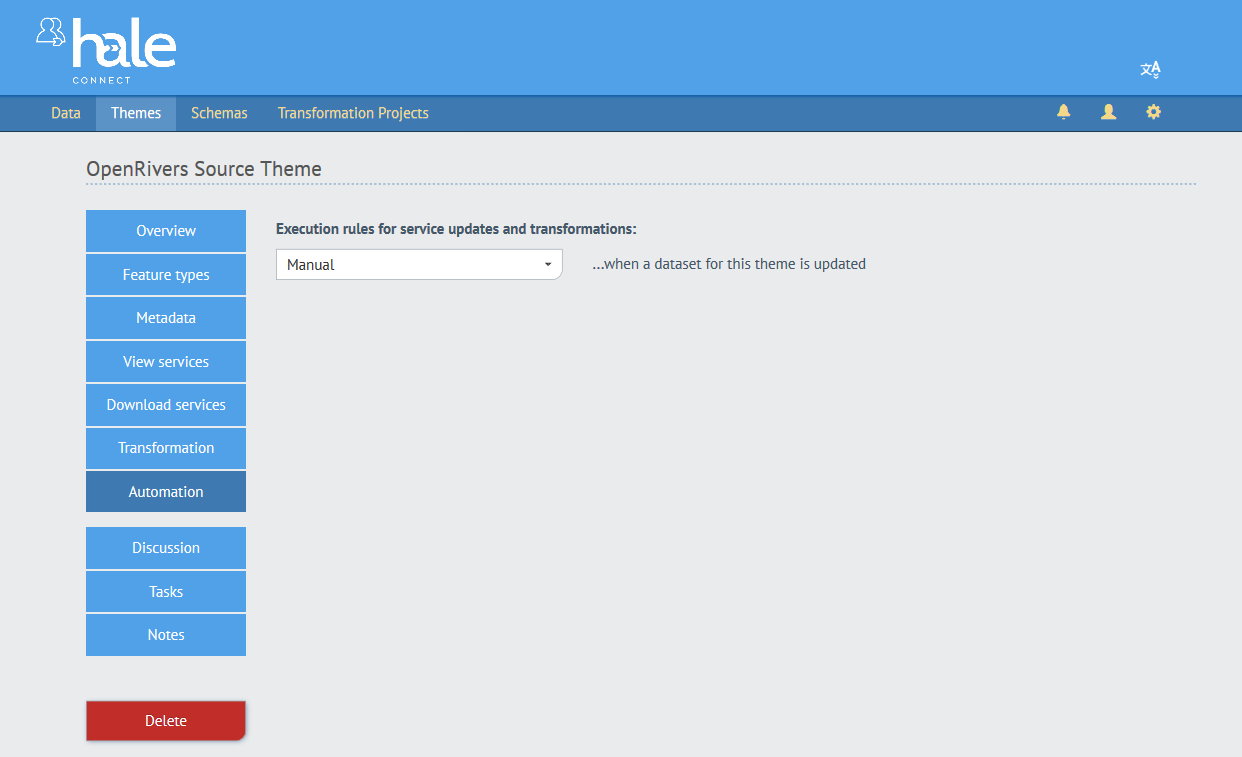
- Click the dropdown menu and select when the execution should happen - manually, immediately or later.
If you’ve selected «Later», proceed to set up when exactly the transformation and publishing should be executed:
- Daily: Pick the time of the day at which the transformation and publishing should be executed.
- Weekly: Pick the weekday and the time of the day at which the transformation and publishing should be executed.
- Monthly: Pick the day of the month and the time of the day at which the transformation and publishing should be executed.
Step 5: Configure a target theme
In this step, we will configure the provision of INSPIRE-compliant view and download services. The target theme defines how your transformed, INSPIRE GML is published. Themes enable you to choose the types of webservices which are offered (WFS, Predefined dataset, OGC API - Features, WMS), the spatial reference systems of services and much more. Let's take a look at some of the options now.
First, navigate to the theme you created during schema creation in Step 3.
- Go to “Themes” on the main toolbar
- Enter the name of your target theme in the search bar. When you create a theme during schema creation, your theme is automatically given the same name as your schema. You can also use the dropdown menu next to “Sort order”. Select “Last modified” to view your most recent themes.
- Select your theme from the list of resources
Next, we will configure the View service settings.
- Click the section named View services
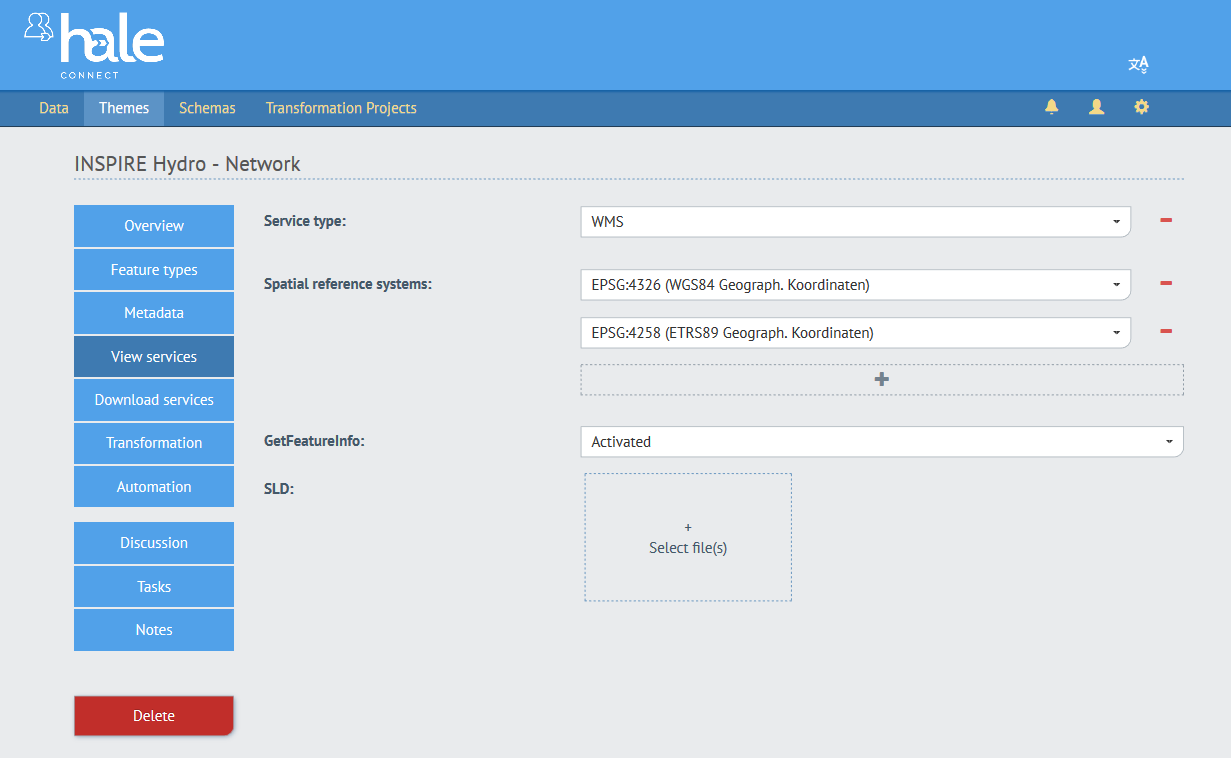
- Click the “+” button under the default spatial reference system to add an additional spatial reference system
- Add the INSPIRE compliant spatial reference system EPSG:4258. You can edit the default spatial reference system, and add as many additional spatial reference systems as you like. Your view services will be available in the spatial reference systems you configure in this setting.
- Click the dropdown menu next to GetFeatureInfo. Activating GetFeatureInfo allows your WMS to be queried.
Now let's take a look at the Download service settings.
- Click the section named Download services
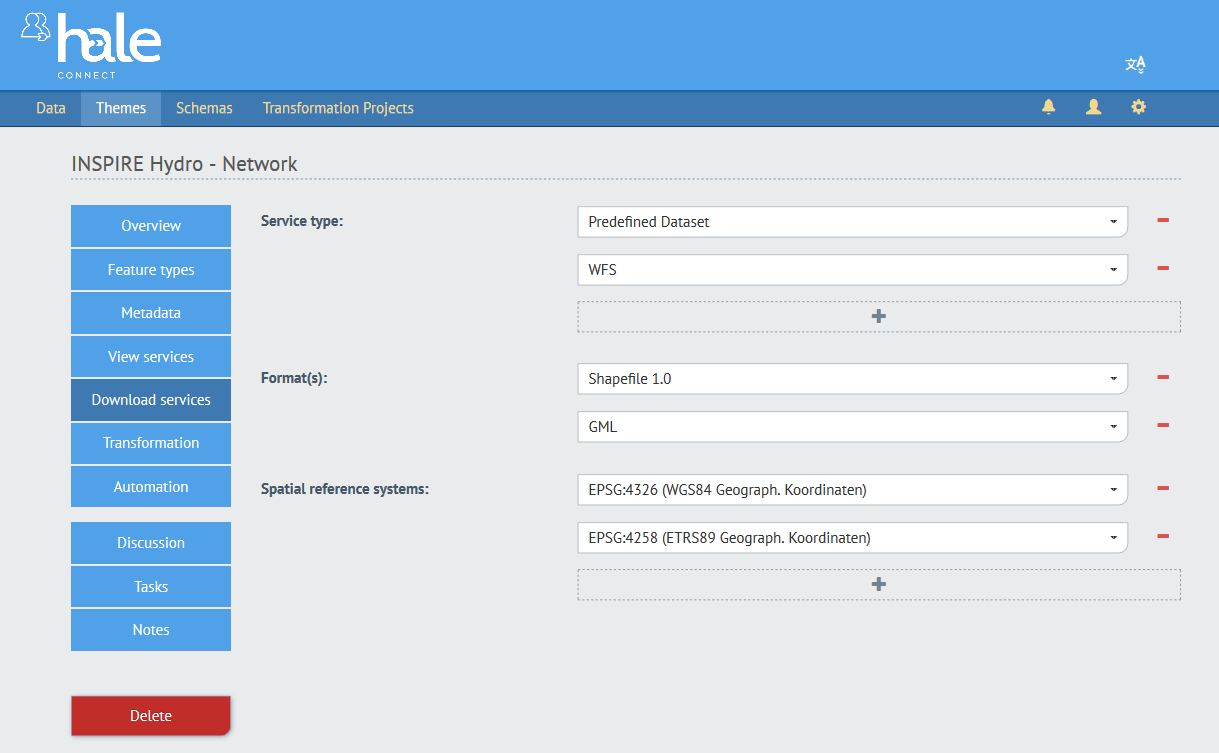
- Click the “+” button under Predefined Dataset to add an additional service type
- Select WFS from the dropdown menu. Now the download services will be available as both an ATOM feed (Predefined dataset) and as WFS.
- Select OGC API Features from the dropdown menu. Now the download services will be available as both an ATOM feed (Predefined dataset) and as OGC API - Features.
- Click the “+” button under Shapefile 1.0 to add an additional data format
- Select GML from the dropdown menu. Now the Predefined dataset will offer both shapefile and GML download options. The downloads will be available in each of the spatial reference systems you configure in the Download service settings.
Finally, we will configure the target theme to automatically republish INSPIRE webservices when the transformed GML is updated or changed.
- Click the section named Automation
- Click the dropdown menu and select “Immediately”
This setting ensures that your published webservices will immediately reflect any changes to your transformed data which could occur as a result of the re-running of an online transformation project.
Step 6: Create a source dataset
In the final step, we will create a source dataset and execute the online transformation workflow we configured in this tutorial. With both source and target themes configured, we can upload data, run an online transformation and publish INSPIRE view and download services in just a few clicks.
-
Go to «Data» on the main toolbar
-
Go to «Create new Data Set» at the bottom of the dataset list
-
Select your source theme to link to your dataset.
-
Click «Select file(s)» and navigate to the tutorial data named OpenRivers.zip. If you are working with shapefiles, we recommend that you upload them in a .zip file.
-
Give your dataset a name. This name should enable you to quickly und clearly identify the dataset in the system.
-
Provide metadata for your dataset. There are several ways to add metadata for a dataset. For more information, visit our help section.
-
The «Set project variables» step will appear if your theme has a transformation configuration and you have added project variables to your transformation project in hale»studio. hale»connect provides users the option to edit the transformation project variable in this optional step.
-
In the final step, you can review the steps of the publishing and transformation process configured for the theme. You will see five toggle switches to publish download and view services for your source dataset, to transform the new dataset, and to publish services for the transformed dataset. Activate all of the toggle switches and click «Create»
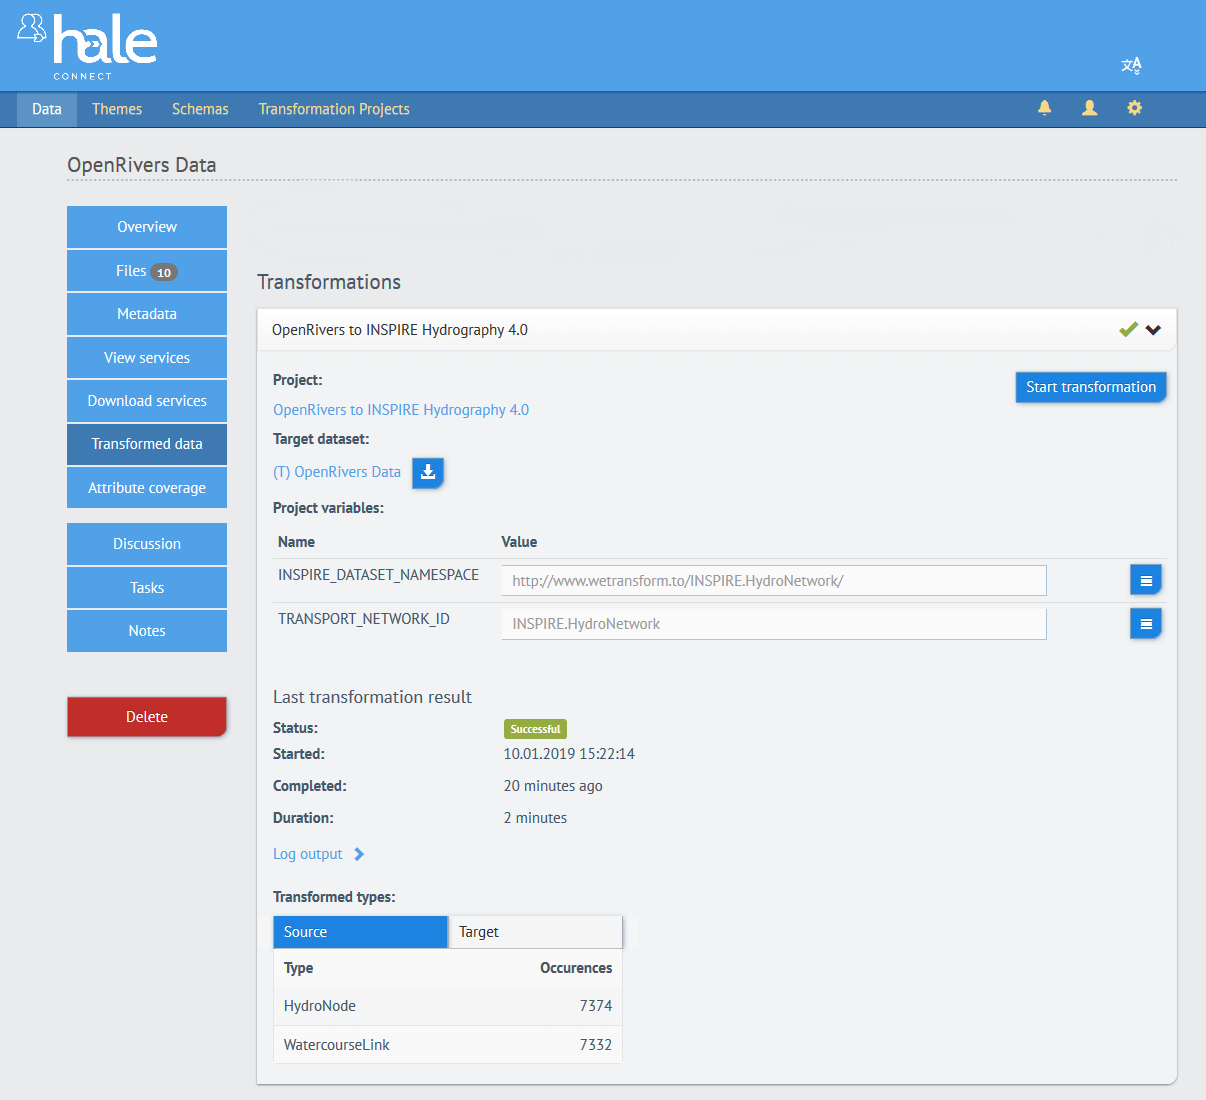
hale»connect will run the online transformation workflow and automatically direct you to your newly published source dataset. It is important to understand that your source data has also been transformed to INSPIRE GML, and published at the same time. To view your transformed dataset:
- Click the section named Transformed Data
- Click the transformation project listed in the panel
- Click the link under “Target dataset:” to view your INSPIRE view and download services for your transformed, GML data
- Click the View services section of your transformed dataset
- Click “Map view” to explore your new, transformed dataset
In this tutorial we configured an online transformation workflow which can be reused by multiple users, with any role, as often as necessary. Once it is configured, it can be easily edited or updated to reflect your changing needs. You can update your existing hale»connect transformation project directly from hale»studio, and edit your existing source and target themes if you require changes. Online transformation workflows are ideal for users with source data that experiences frequent updates because it alleviates the need to perform manual transformations and publications over, and over, again. When your source data changes, the online transformation workflow will automatically rerun the transformation and republish your INSPIRE services to provide your users with the most current version of your data.