Configuring metadata on hale»connect
Metadata creation is often a time-consuming, tedious and error-prone task. The hale»connect platform can be configured to automatically generate ISO, INSPIRE and GDI-DE compliant metadata for datasets and view and download network services. hale»connect gathers information from datasets, environment variables such as user profile data, and user-defined custom metadata fields, to auto-generate metadata compliant with numerous metadata standards. The default metadata that hale»connect generates can be configured by Theme managers and Superusers in the metadata section of a theme. Metadata configuration only needs to be configured once. The theme containing the metadata configuration can be re-used multiple times by any user, for any dataset in an organisation.
This tutorial reviews the steps required to configure metadata using hale»connect's metadata editor tool. The validation tests hale»connect executes to ensure ISO, INSPIRE and GDI-DE metadata compliancy are also discussed. Before we begin, let's review a list of the hale»connect resources we need:
- Theme manager or Superuser hale»connect profile
- dataset
- schema(s) for your dataset
- theme
IMPORTANT: Default metadata is automatically generated by hale»connect for datasets, and network services. The configuration of metadata is optional.
Tutorial data
For this tutorial, we will use:
- One shapefile Contains OS data © Crown copyright and database right 2018. You can download the shapefile here.
Configuring metadata using the Metadata Editor
Step 1: Add custom metadata fields
hale»connect provides users with the option to add custom metadata fields to the Organisation section found under Settings, and to a user's profile. Custom metadata fields hold values that can be used to prefill metadata elements. In order to auto-populate metadata, hale»connect gathers information across the platform, including all of the user-supplied values in the user profile and Organisation sections. In some cases, hale»connect automatically applies these collected values to metadata fields.
When you create a custom metadata field, hale»connect adds the key, value pair(s) provided to the autofill assistant in the metadata editor. We will take a look at the autofill assistant later. First, let's add a custom metadata field.
To create a new custom metadata field in your organisation profile, follow this workflow logged in as a Theme Manager or Superuser:
- Click the Settings icon (gear symbol) at the top right of the screen
- Click the Organisations section and select your organisation from the list
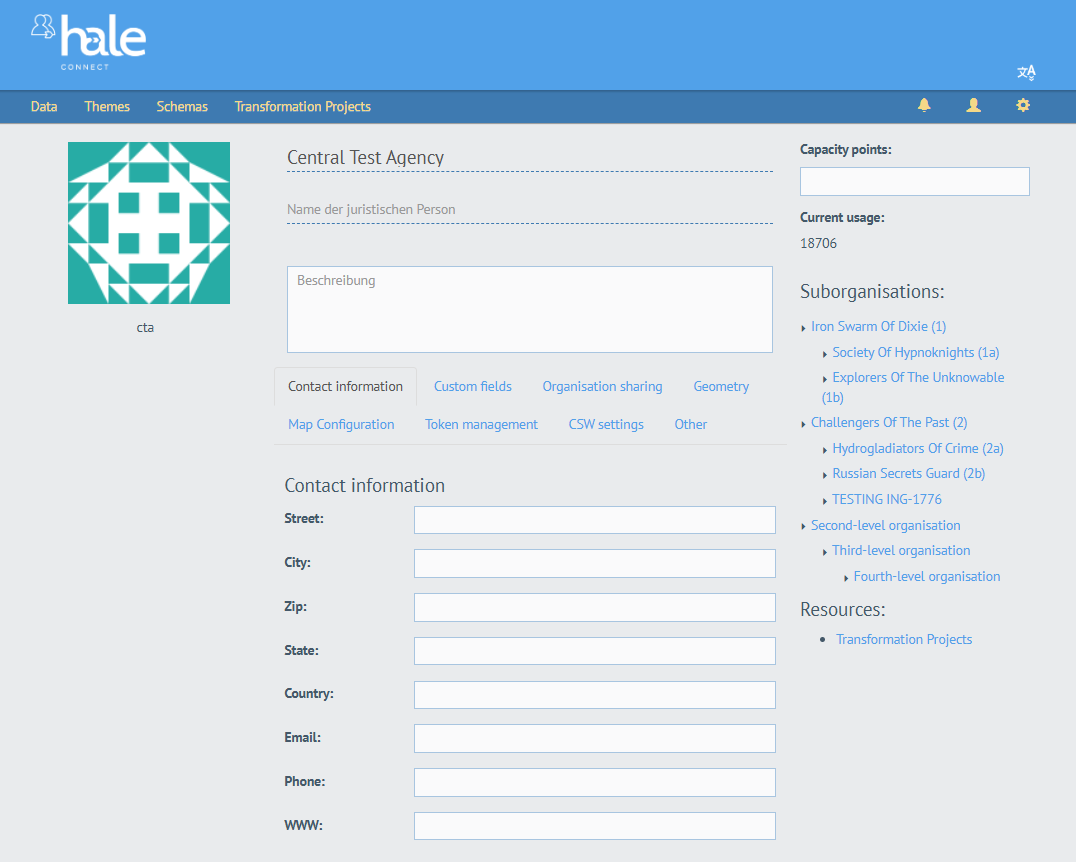
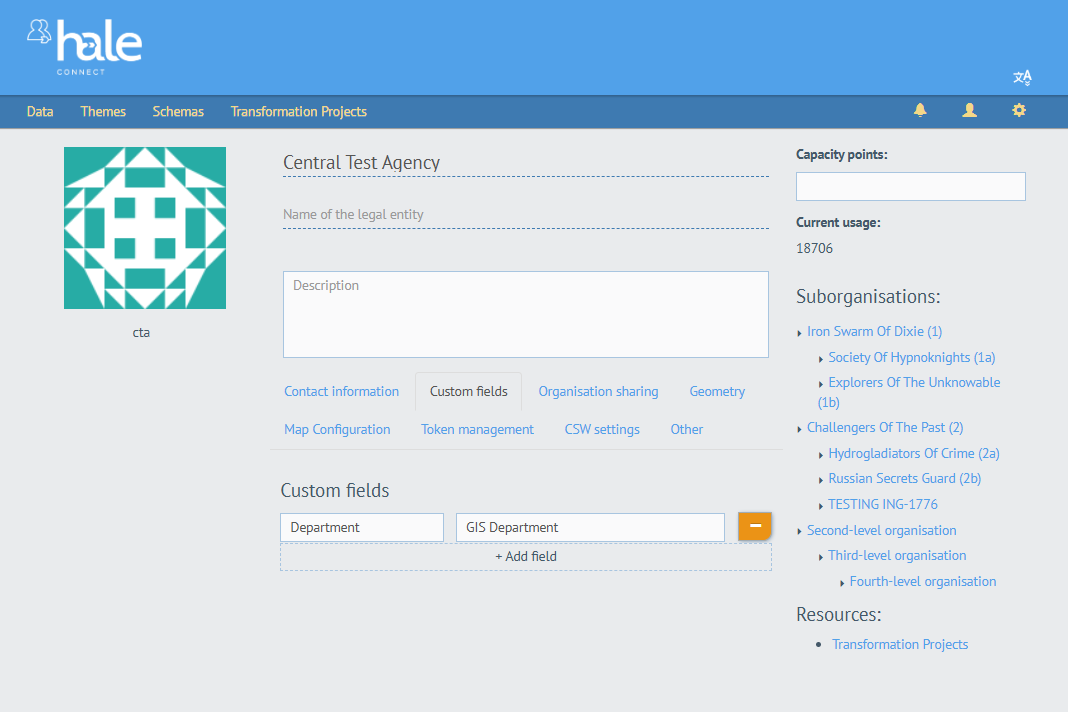
- Select the tab «Custom fields» below the description field of the organisation profile page and click «+ Add field» to add your custom key-value pair
- The key-value pair that you enter will be available to you in the autofill assistant during metadata configuration.
To add a custom field to your user profile, follow this workflow logged in as a Data Manager, Theme Manager or Superuser:
- Click the User profile icon (person) at the top right of the screen
- Scroll to the bottom of the user profile page and click «+Add field» to add your custom key, value pair
- The key, value pair that you enter will be available to you in the autofill assistant during metadata configuration.
- All organisation users can add custom metadata fields to their user profiles. Theme Managers and Superusers configuring metadata should come to an agreement with Data Managers on the custom metadata fields that will be implemented. Themes configured to use custom metadata fields in user profiles will access the value from the user profile of the person creating the dataset.
IMPORTANT: Custom metadata fields are optional.
Step 2: Create a schema and a theme for your data
The next step in the metadata configuration workflow is to create a schema and a theme for your dataset. Your dataset is the data that you want to create metadata for. hale»connect provides several options for creating a schema. You can visit the following documentation pages to learn more about schema creation:
- Create a schema based on a schema preset
- Create a schema by uploading a schema file
- Create a schema using a web address
- Create a new schema based on an existing schema
In this tutorial, we will work with the option to create a schema by uploading a schema file. Your source data is in shapefile format, and the option to create a schema by uploading a schema file enables us to simply upload a shapefile. hale»connect automatically reads the shapefile and generates a schema for you.
To create a new schema based on a shapefile, follow this workflow logged in as a Theme Manager or Superuser:
-
Go to “Schemas” on the main toolbar
-
Go to “Create new schema” at the bottom of the schema list
-
Select creation method. In the first step, select «Upload schema file». Click «Continue»
-
Next, define the schema you want to use. The schema definition is determined by the creation method you selected in the previous step.
-
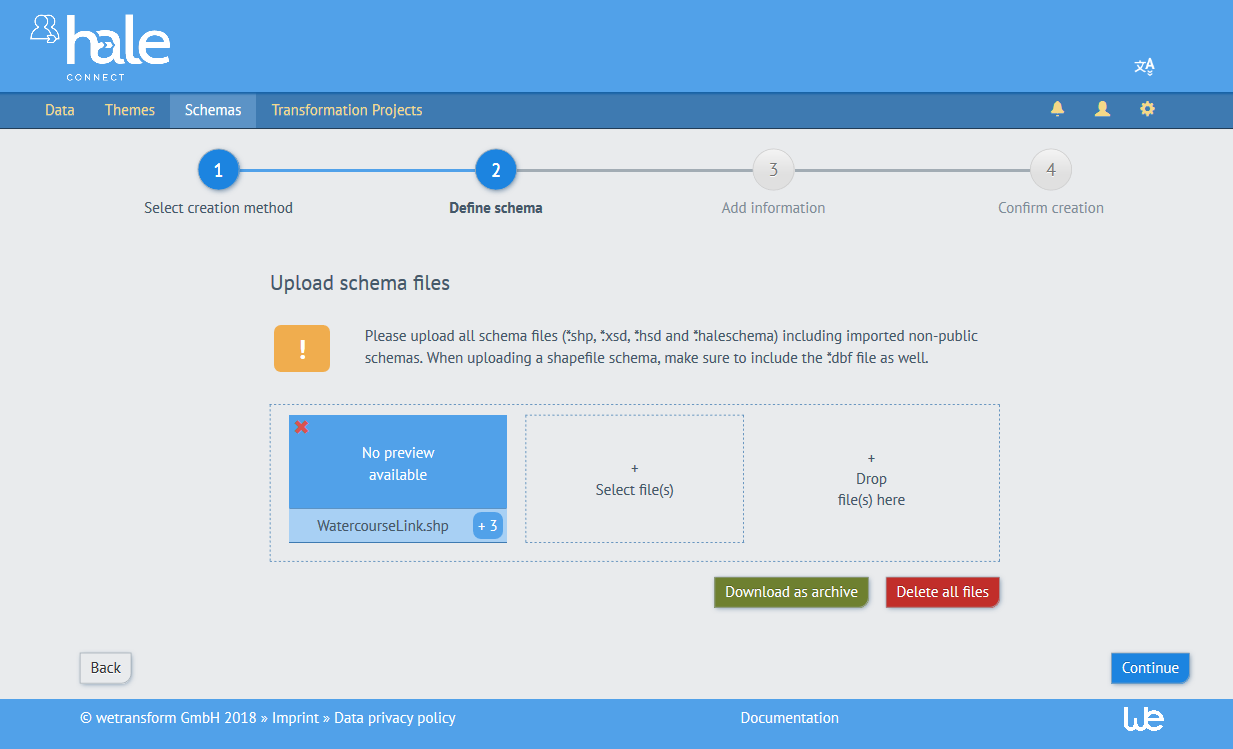
Click the «Select file(s)» button and navigate to the shapefile located in the tutorial data folder. Add the shapefile named WatercourseLink. You can also upload the zipped folder which contains the shapefile. When you are finished, click «Continue»
-
Add information. Provide the name, author, type and version of your schema. When you are finished, click «Continue»
-
Confirm creation. In the final step, review your schema. You have the option to add or create a theme for your schema. Toggle the switch to enable the creation of a theme. When you are finished, click «Create» to save the schema and create an associated theme.
-
Step 3: Configure metadata in your theme
A theme is a re-usable configuration object used to define common settings for dataset metadata, service publishing and transformation. A theme has several elements:
- A schema, defined through association with a number of feature types
- Display properties for the fields and types of that schema, such as aliases and styling
- A metadata configuration which defines the metadata fields that need to be provided, as well as default values and autofill rules for a high degree of automation
- An association with a transformation project that enables format conversion and schema transformation
- A configuration for an automated workflow that can be set to execute service publishing and data transformation on certain events such as an update to a dataset
The metadata editor tool is located in the Metadata section of your theme. In this step, we will use the metadata editor to create a re-useable metadata configuration which utilizes custom fields, autofill rules and enumerations. The metadata configuration is applied to all datasets that use your theme. If you have metadata that you want to re-use, visit the Edit metadata configuration section of our help for more information.
First, navigate to the theme you created during schema creation in Step 2.
- Go to “Themes” on the main toolbar
- Enter the name of your theme in the search bar. When you create a theme during schema creation, your theme is automatically given the same name as your schema. You can also use the dropdown menu next to “Sort order”. Select “Last modified” to view your most recent themes.
- Select your theme from the list of resources
- Click the section named Metadata
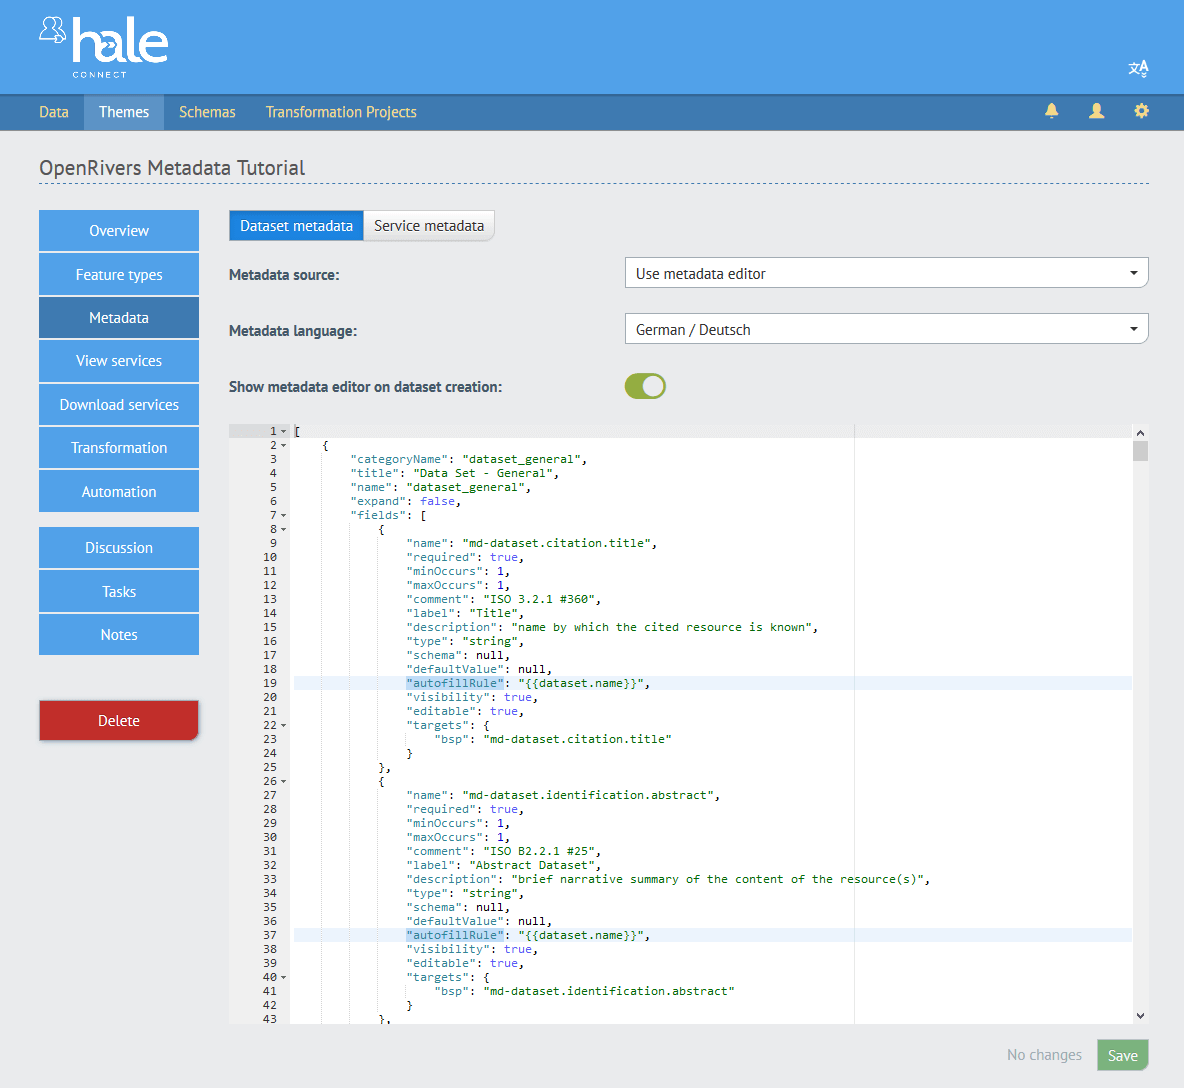
The Metadata section contains configuration settings and an editable JSON text editor that enables Theme managers and Superusers to customize the default metadata template. The default metadata template is a list of category objects which are used to create valid ISO, INSPIRE and GDI-DE metadata files. Each category object and the list of fields contained within it, provides the information required to populate metadata properties in the supported metadata profiles. The metadata template is used internally to map user-provided metadata values to the metadata profiles. The comment field in each category object identifies the relevant metadata profile. For example: "comment": "ISO 3.2.1 #360" indicates that the object fulfils the requirement of the ISO 19115 Geographic information – Metadata profile, section B.3.2.1 item #360.
Let's take a look at the list of fields in a category object, because that is what you have to configure.
{
  "name": "md-dataset.citation.title",
  "required": true,
  "minOccurs": 1,
  "maxOccurs": 1,
  "comment": "ISO 3.2.1 #360",
  "label": "Title",
  "description": "name by which the cited resource is known",
  "type": "string",
  "schema": null,
  "defaultValue": null,
  "autofillRule": "{{dataset.name}}",
  "visibility": true,
  "editable": true,
  "targets": {
    "bsp": "md-dataset.citation.title"
  }
}
It is important to understand that the internal mapping is based on the name field of each category object. Values entered in the name field are limited to the following values:
- md-dataset.citation.title
- md-dataset.identification.*
- md-dataset.identification.abstract
- md-dataset.identification.keyword_inspire
- md-dataset.identification.keyword_simple
- md-dataset.identification.topicCategory
- md-dataset.identification.geographicExtent.eastBoundLongitude
- md-dataset.identification.geographicExtent.northBoundLatitude
- md-dataset.identification.geographicExtent.southBoundLatitude
- md-dataset.identification.geographicExtent.westBoundLongitude
- md-dataset.identification.topicCategory
- md-dataset.identification.constraints.useLimitations
- md-dataset.identification.constraints.useConstraints
- md-dataset.identification.constraints.accessContraints
- md-dataset.identification.contactForResource.*
- md-dataset.identification.contactForResource.individualName
- md-dataset.identification.contactForResource.authorityUrl
- md-dataset.identification.contactForResource.organisationName
- md-dataset.identification.contactForResource.positionName
- md-dataset.identification.contactForResource.roleCode
- md-dataset.identification.contactForResource.email
- md-dataset.identification.contactForResource.deliveryPoint
- md-dataset.identification.contactForResource.postalCode
- md-dataset.identification.contactForResource.city
- md-dataset.identification.contactForResource.administrativeArea
- md-dataset.identification.contactForResource.country
- md-dataset.identification.contactForResource.voicePhone
- md-dataset.identification.contactForResource.facsimile
- md-dataset.contactForMetadata.*
- md-dataset.contactForMetadata.individualName
- md-dataset.contactForMetadata.authorityUrl
- md-dataset.contactForMetadata.organisationName
- md-dataset.contactForMetadata.positionName
- md-dataset.contactForMetadata.roleCode
- md-dataset.contactForMetadata.email
- md-dataset.contactForMetadata.deliveryPoint
- md-dataset.contactForMetadata.postalCode
- md-dataset.contactForMetadata.city
- md-dataset.contactForMetadata.administrativeArea
- md-dataset.contactForMetadata.country
- md-dataset.contactForMetadata.voicePhone
- md-dataset.contactForMetadata.facsimile
- md-dataset.fileidentifier
- md-dataset.mdIdentifierLocalId
- md-dataset.mdIdentifierNamespace
The required, minOccurs and maxOccurs fields express the cardinality of the metadata value, and should not be altered. Each additional field describes how the input should look and behave in the user interface, what kind of content is allowed, and whether default values or derived values should be inserted.
- label: The label that should be displayed to the user next to the input field.
- description: A longer, explanatory text for the fields that is displayed on hovering over the label.
- type: The primitive type of data this field expects. One of string, object, array, integer and float.
- schema: The schema or format of the value to be inserted. One of email, enum, geojson, json, wkt and csv.
- defaultValue: A fixed default value that will be assigned to the field if it does not contain a value yet. Please note that when transforming data, the metadata values of the source dataset are copied to the target dataset and in that case, a configured default value will not overwrite it. In on-premise deployments, the behaviour for the target dataset can be changed by setting the feature toggle
TRANSFORMATION_AUTOFILL_REPLACE_DEFAULTStotrue. - autofillRule: A dynamic default value that will be assigned to the field. This value is calculated from the current environment variables such as the user, the organisation context, the data set and the theme. When you click into a row with an
autofillRuleproperty key, an assistant for choosing a value appears in the upper right corner of the editor. - editable: Set to
truewhen the data manager should be able to edit the value in this field. - targets: This is a list with mapping rules to external services, such as metadata catalogues. By default, there should always be at least a
bsptarget defined.bspis what hale»connect needs in order to publish services.
In this tutorial we will focus on the following fields, each of which can be configured by the user to support the automatic creation of metadata in hale»connect:
typedefaultValueautofillRulevisibilityeditableenumValues
The first category object in the metadata editor provides the name of the dataset: "name": "md-dataset.citation.title". In the first example, we will set the editable property to false. Place your cursor next to the editable property and type "false". This option prevents other users in your organisation from editing the auto fill value.
The second category object provides a brief summary of the dataset: "name": "md-dataset.identification.abstract". In this example, we will set the visibility property to false. Place your cursor next to the visibility property and type "false". This option controls the number of fields users must view during dataset creation.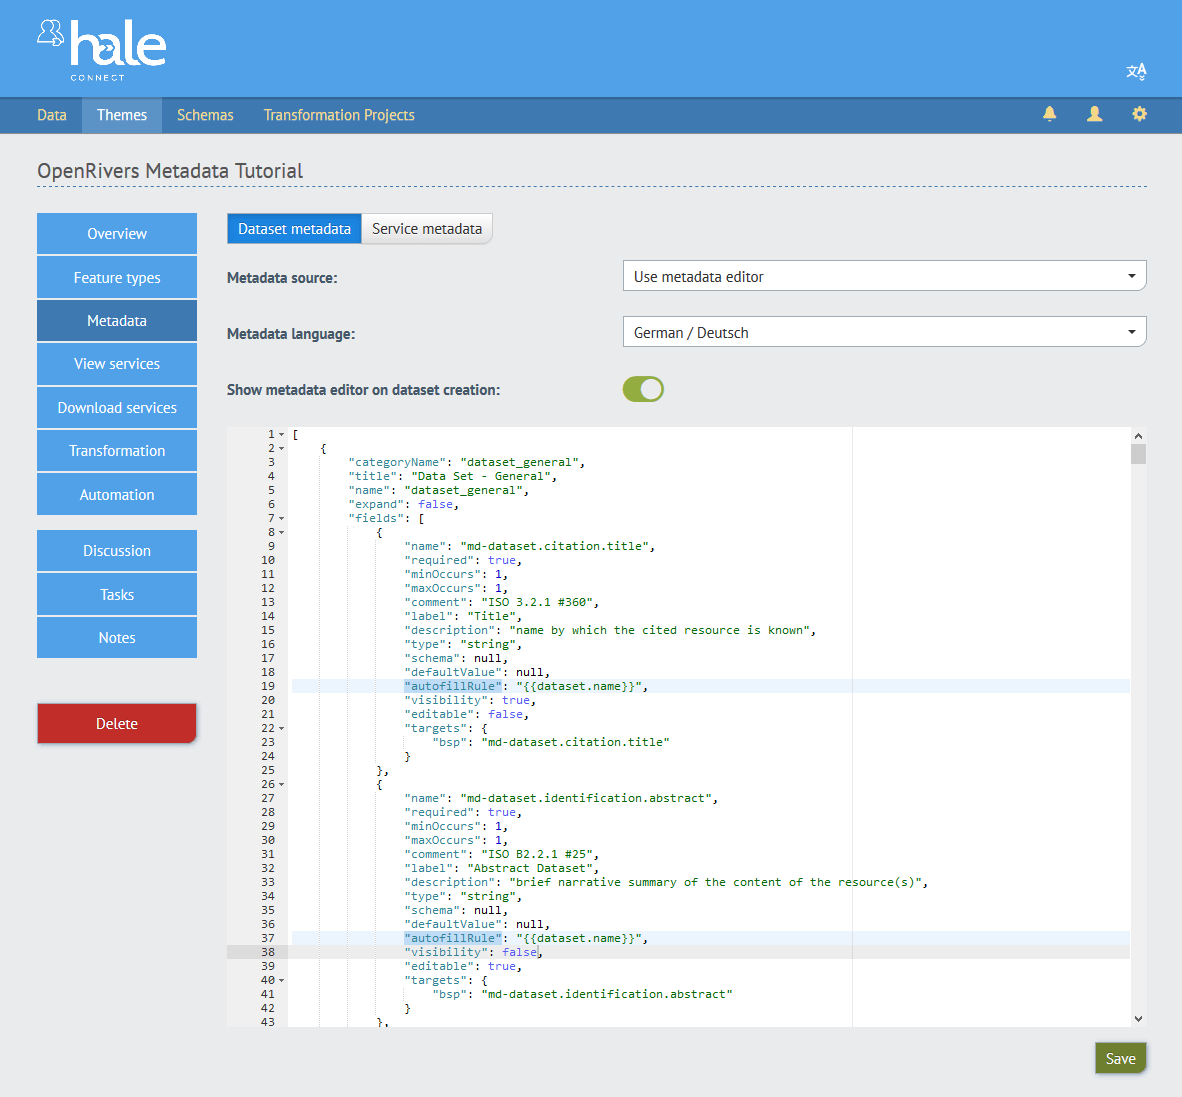
The third category object provides an enumeration example: "name": "md-dataset.identification.keyword_inspire". Enumeration fields enable you to create dropdown menus in the metadata entry user interface. The label, value pairs define the labels shown in the user interface and the mapping values used internally. You can edit the labels in an enumeration to display labels in a different language in the user interface. You cannot edit the associated values because they are used in an internal mapping.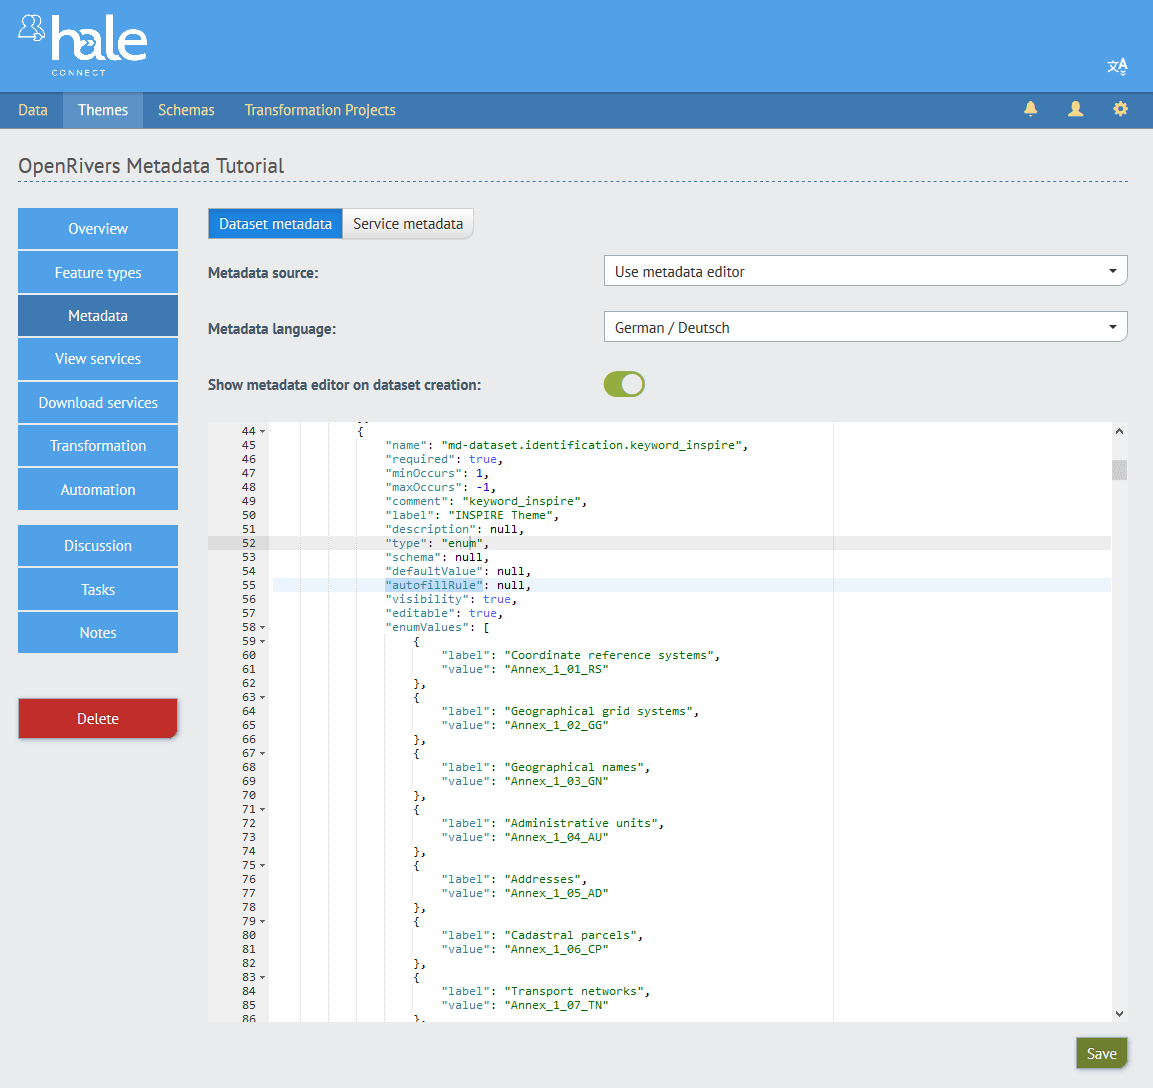
The fourth category object provides simple keywords: "name": "md-dataset.identification.keyword_simple". In this example, we will set the defaultValue to 'INSPIRE' so that the field is always populated with this value. Place your cursor next to the defaultValue property and type "INSPIRE". The field remains editable, so users can change the value if necessary.
In the last example, we will use custom metadata fields to create autofill rules. In this example, we will work with the category object: "name": "md-dataset.contactForMetadata.positionName". Place your cursor next to autofillRule:. The autofill assistant will appear in the upper right corner of the editor. Click on Organisation in the autofill assistant, and scroll to Custom fields. Click Custom fields in the assistant, and click on the key value you set in step 1 of this tutorial. The metadata will now auto-populate with the value you entered in your newly created custom field.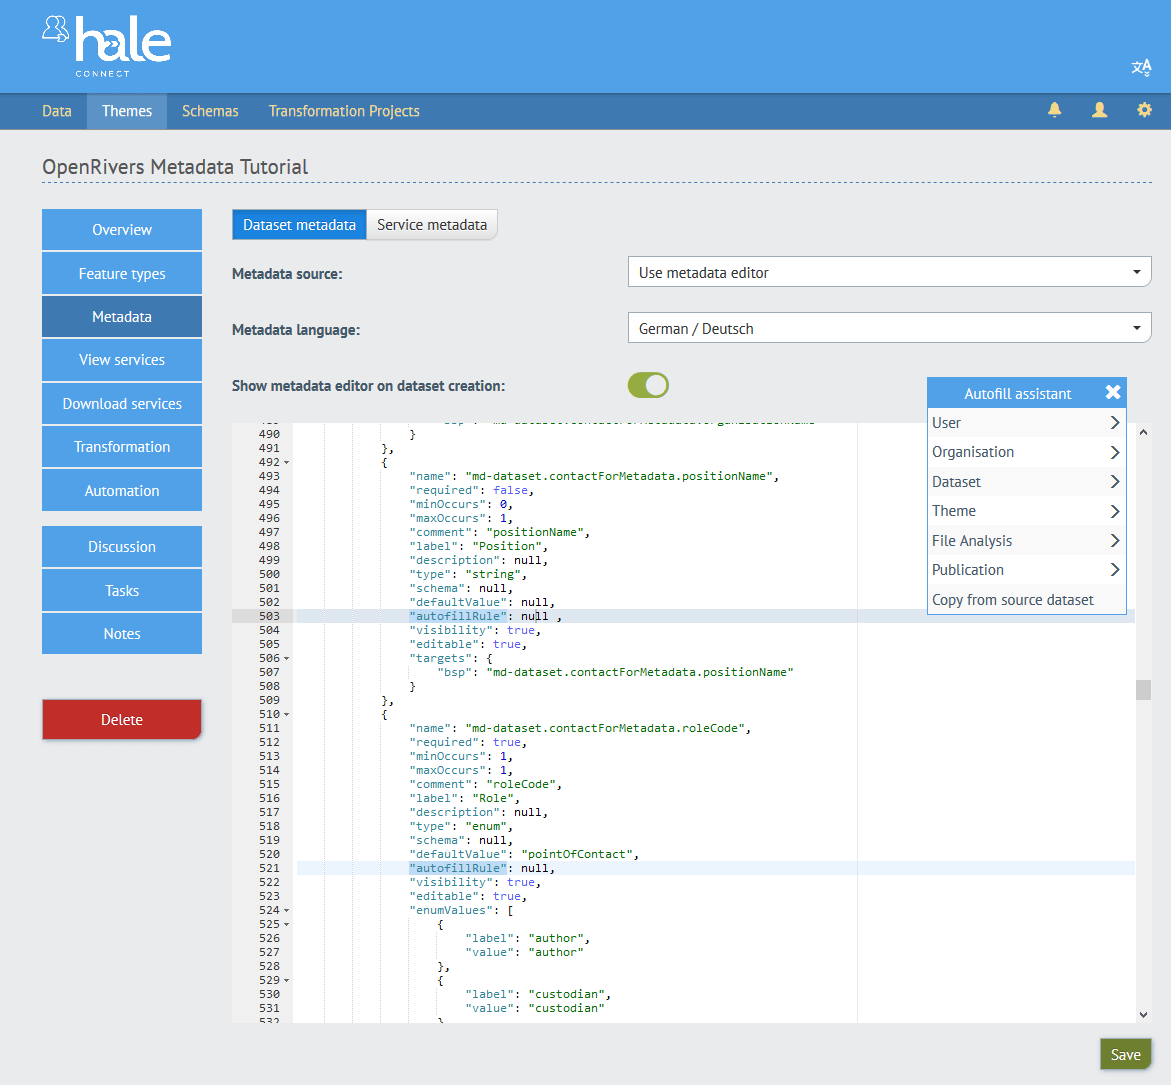
Once you have configured the template in the editor, click the «Save» button at the bottom of the page.
Step 4: Publish and validate your dataset and metadata
In the final step, we will create a dataset and view the metadata that we configured in this tutorial. Using our configured theme, we can upload data and create metadata in a few simple steps.
-
Go to «Data» on the main toolbar
-
Go to «Create new Data Set» at the bottom of the dataset list
-
Select your theme to link to your dataset.
-
Click «Select file(s)» and navigate to the tutorial data named Metadata_TutorialData.zip. If you are working with shapefiles, we recommend that you upload them in a .zip file.
-
Give your dataset a name. This name should enable you to quickly und clearly identify the dataset in the system.
-
Provide metadata for your dataset. In this step, we will see the results of our metadata configuration. There is a list of several, expandable panels which contain both optional and required metadata elements.
- Expand the first panel, "Data Set - General" to check:
- The Title field is not editable
- The Abstract Dataset field is not visible
- Put your cursor in the INSPIRE Theme dropdown menu to view the enumeration values
- Expand the "Data set - Contact for Metadata" panel to check:
- The Position field is populated with your custom metadata field value
- Expand the first panel, "Data Set - General" to check:
-
In the final step, you can review the steps of the publishing process configured for the theme. You will see two toggle switches to publish download and view services for your dataset. Activate the toggle switches and click «Create»
hale»connect will immediately begin to test and validate your metadata.
- Click the section named View Services
- The test reports panel provides a list of PDFs which contain the results of a series of tests executed on published metadata and services. Tests check for ISO, GDI-DE and INSPIRE compliancy. For more information, visit our View Services help section.
- Click on any of the listed test reports to view the results
Metadata configuration helps users to create metadata quickly and efficiently, greatly reducing the potential for error. The hale»connect platform gathers information from across the platform to automate the metadata generation process and produce valid and compliant dataset and network service metadata. In this tutorial we configured metadata in a theme which can be reused by multiple users, with any role, as often as necessary, greatly reducing the burden of metadata requirements.